To install a 240V breaker, turn off the power, remove the panel cover, connect the breaker, and secure it tightly. Are you looking to install a 240V breaker in your electrical panel?
If so, it is crucial to follow the correct steps to ensure a safe and effective installation. By carefully turning off the power, removing the panel cover, connecting the breaker, and securing it tightly, you can successfully add a 240V breaker to your electrical system.
We will discuss each step in detail, providing you with the information you need to complete the installation process accurately. Follow these guidelines to ensure a successful installation of your 240V breaker.
Understanding The Benefits Of A 240V Breaker
When it comes to electrical circuits, one of the essential components is the breaker. A breaker helps protect the circuit from overloading and short circuits by automatically shutting off the power. While standard breakers supply 120 volts, a 240V breaker offers higher power capacity and numerous benefits for heavy-duty appliances. In this article, we will explore the advantages of installing a 240V breaker and how it enhances electrical stability, energy efficiency, and power capacity.
Higher power capacity for heavy-duty appliances
Heavy-duty appliances such as electric dryers, ovens, air conditioners, and industrial equipment require substantial power to function effectively. A 240V breaker provides the necessary power capacity to meet their demands. Unlike standard breakers that supply only 120 volts, a double-pole 240V breaker is capable of delivering a higher voltage, usually split into two 120V circuits. This higher power capacity ensures that heavy-duty appliances receive the necessary energy to operate efficiently.
More efficient energy consumption
When it comes to energy consumption, a 240V breaker offers greater efficiency compared to a standard breaker. By delivering a higher voltage, heavy-duty appliances connected to a 240V breaker can operate more efficiently. The higher voltage reduces energy loss during transmission, resulting in lower electricity bills. Additionally, the increased voltage supplied by a 240V breaker enables appliances to start, run, and cool down faster. This efficiency not only saves energy but also extends the lifespan of the appliances connected to the circuit.
Better electrical stability
Another significant benefit of installing a 240V breaker is the improved electrical stability it provides. Heavy-duty appliances require a stable power supply to function optimally and avoid damage. With a 240V breaker, you can ensure a stable voltage supply that meets the demands of power-hungry devices. The increased voltage capacity helps prevent voltage fluctuations, voltage drops, and power surges, which can harm sensitive electronics and appliances. By maintaining a stable electrical supply, a 240V breaker safeguards your appliances and protects your investment.
Assessing Your Electrical System For Compatibility
When installing a 240V breaker, it’s essential to assess your electrical system for compatibility. Making sure your system is compatible will ensure a safe and efficient installation process. To do this, you need to check the existing electrical panel, determine the load requirements, and ensure proper wiring and grounding. Let’s delve into each step in more detail.
Checking the existing electrical panel
The first step in assessing your electrical system for compatibility is to check the existing electrical panel. This is where the breakers for your home’s electrical circuits are housed. Make sure to examine the panel to determine if it has the capacity for an additional 240V breaker. Here are a few key points to consider during this inspection:
- Check the panel’s amperage rating to ensure it has enough capacity to handle the additional load. The amperage rating is typically labeled on the panel door or near the main breaker. If the panel’s rating is below the required amperage for the 240V breaker, it may be necessary to upgrade the panel.
- Inspect the available space in the panel. A 240V breaker generally requires two slots, so confirm that there is enough room for installation.
- Look for any signs of wear or damage on the panel. Cracked or loose connections, rust, or burn marks may indicate underlying issues that should be addressed before installing the breaker.
Determining the load requirements
Determining the load requirements of your electrical system is crucial when installing a 240V breaker. The load refers to the amount of power consumed by the appliances or devices connected to the breaker. Here’s how to accurately determine the load requirements:
- List down all the appliances and devices that will be connected to the 240V breaker.
- Check the rating plates or labels on each appliance or device to find their power consumption specified in watts or amps.
- Calculate the total load by summing up the individual power consumption of all the devices.
It’s important to note that the total load should not exceed the amperage rating of the breaker. If it does, you may need to distribute the load across multiple breakers or consider upgrading your electrical system.
Ensuring proper wiring and grounding
Proper wiring and grounding are vital for the safe and effective functioning of a 240V breaker. The following measures should be taken to ensure proper installation:
- Verify the wire gauge requirements for the 240V breaker and use wires of the appropriate size. Using undersized wires can lead to overheating and potential hazards.
- Inspect the wiring for any signs of damage or deterioration. Replace any damaged wires before proceeding with the breaker installation.
- Ensure that the breaker is properly grounded. A grounding wire should be connected to the grounding bar or a dedicated grounding lug within the electrical panel.
By following these steps to assess your electrical system for compatibility, you can ensure a smooth and successful installation of a 240V breaker. Remember, if you are unsure about any aspect of the installation, it’s always best to consult a licensed electrician for assistance.
Gathering The Necessary Tools And Materials
In order to successfully install a 240V breaker, you will need to gather the necessary tools and materials. Having these ready beforehand will save you time and ensure a smooth installation process.
Breaker panel schedule
The first tool you will need is a breaker panel schedule. This is a document that provides information on the layout and capacity of your breaker panel. It will tell you which slots are available for installing new breakers and what the maximum load capacity is for each slot. Having this information at hand will help you plan your installation and avoid overloading the circuit.
Voltage tester
A voltage tester is an essential tool for electrical installations. It allows you to check if a circuit is live and measure the voltage level. This is crucial for your safety and also ensures that you are working with the correct power source. Make sure to test the circuit before starting any work.
Screwdriver
A screwdriver is another tool that you will need when installing a 240V breaker. It will be used to remove the cover of the breaker panel and secure the breaker in its designated slot. Choose a screwdriver with the appropriate size and ensure it has a comfortable grip for ease of use.
Wire strippers
Wire strippers are necessary for removing the insulation from the wires. They have different-sized notches to accommodate different wire gauges. It is important to use the correct notch size to avoid damaging the wires. These tools make the process of wire stripping quick and efficient.
Copper grounding wire
A copper grounding wire is an important part of any electrical installation. It provides a safe pathway for electrical current to be redirected in the event of a fault or electrical surge. This wire is commonly attached to the breaker panel and connected to a grounding rod or other suitable grounding source.
Insulated cables
Insulated cables are used to connect the breaker to the circuit. It is crucial to use the correct gauge wire for your specific application. The size of the wire will depend on the ampere rating of the breaker and the length of the circuit. Using the wrong size wire can lead to overheating and potentially dangerous situations.
By gathering these necessary tools and materials, you are now ready to move on to the next step of installing a 240V breaker. Having everything prepared will ensure a smooth and efficient installation process.
Shutting Off Power To The Electrical Panel
Before getting started with installing a 240V breaker, it’s crucial to shut off power to the electrical panel to ensure your safety. This step is important as it eliminates the risk of electrical shock or damage as you work on the breaker installation. In this section, we will guide you through the necessary steps to ensure that the power to the electrical panel is properly shut off.
Locating the main circuit breaker
The main circuit breaker is typically located in the electrical panel and is responsible for supplying power to the entire house. It acts as a switch that controls the flow of electricity. To locate the main circuit breaker:
- Locate the electrical panel in your house. This is usually situated in a basement, garage, or utility room.
- Open the panel door by releasing any latches or screws holding it in place. Be cautious as the panel might contain live wires.
- Look for a large breaker switch, usually at the top or bottom of the panel. This switch often has a higher ampere rating than the other breakers.
Once you have located the main circuit breaker, it’s time to proceed to the next step.
Turning off the main power switch
The main power switch is directly connected to the main circuit breaker and serves as the primary control for shutting off the power to the electrical panel. To turn off the main power switch:
- Stand in a safe position, ensure you have dry hands, and wear rubber-soled shoes to minimize the risk of electrical shock.
- Identify the main power switch, which is typically a lever or a knob located beside the main circuit breaker.
- Switch the lever to the “off” position or turn the knob counterclockwise to shut off the power. You might hear a click or feel a slight resistance when the switch is fully turned off.
Once you have successfully turned off the main power switch, move on to the next step to verify that the power is indeed off.
Verifying that the power is off using a voltage tester
It’s crucial to double-check and make sure that the power to the electrical panel is completely off. The best way to do this is by using a voltage tester, a handheld device that detects the presence of electrical current. Follow these steps to verify that the power is off:
- Obtain a voltage tester that is designed for residential electrical systems.
- Turn on the voltage tester and ensure it is in good working condition.
- Carefully insert the voltage tester’s probes into the slots of any nearby electrical outlets. If the tester lights up or emits a sound, there is still an active electrical current, indicating that the power has not been fully shut off.
- Continue testing other electrical outlets throughout your house to ensure the power is off everywhere.
Once you have verified that the power is indeed off using a voltage tester, you can proceed with confidence to install the 240V breaker. Remember to always prioritize safety and take necessary precautions when working with electricity.
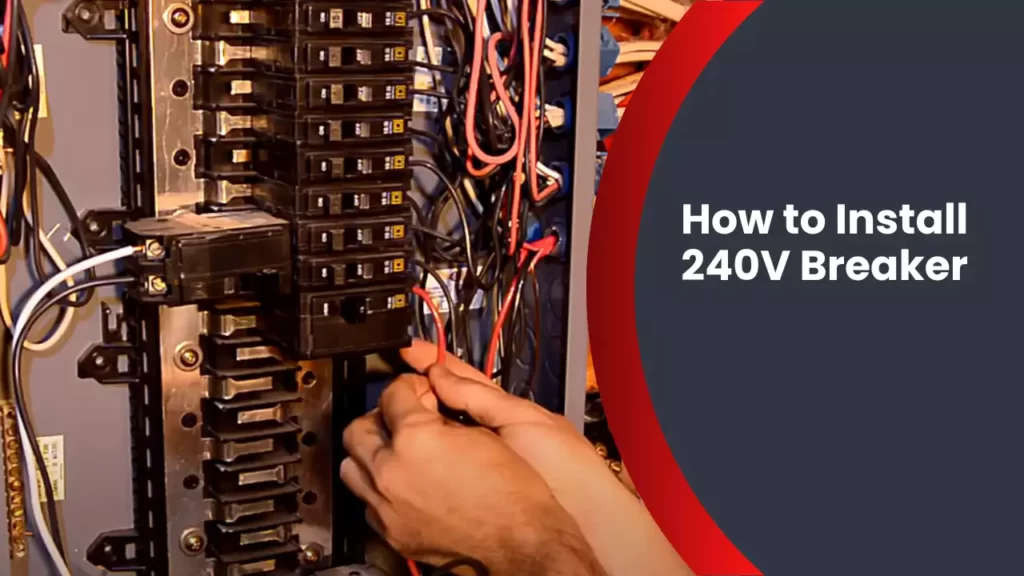
Removing The Existing Breaker
Before you can install a 240V breaker, you need to remove the existing breaker from the panel. This process involves identifying the 240V breaker in the panel, carefully disconnecting the wires from the breaker, and then removing it from the panel. Let’s go through each step in detail.
Identifying the 240V breaker in the panel
The first step to removing the existing breaker is to identify the 240V breaker in the panel. The 240V breaker is usually larger in size compared to the 120V breakers. It may also have a double-pole configuration and be labeled as “240V” or “double-pole”. Additionally, you can check the circuit directory or consult the panel’s manufacturer instructions to locate the breaker.
Carefully disconnecting the wires from the breaker
Once you have identified the 240V breaker, you need to carefully disconnect the wires from it. To ensure safety, it is crucial to turn off the main power supply to the panel before touching any wires. Make sure to wear appropriate protective gear such as gloves and safety goggles.
To disconnect the wires from the 240V breaker, follow these steps:
- Using a screwdriver, loosen the screws that secure the wires to the breaker.
- Gently pull the wires out from the breaker’s terminals.
- Once the wires are disconnected, use electrical tape to cover the ends of the wires to prevent any accidental contact with electrical currents.
Removing the breaker from the panel
Now that the wires are safely disconnected, you can proceed to remove the breaker from the panel. Follow these steps:
- Ensure the main power supply to the panel is still turned off.
- Locate the retaining clips or screws that hold the breaker in place.
- Using a screwdriver, remove the retaining clips or unscrew the screws to release the breaker.
- Gently pull out the breaker from the panel, ensuring not to damage any surrounding wires or components.
Remember to store the removed breaker in a safe place for future use or disposal according to local regulations.
By following these steps, you can successfully remove the existing breaker from the panel, making way for the installation of a new 240V breaker. Remember to always prioritize safety and consult a professional if you are unsure or uncomfortable with any step of the process.
Installing The 240V Breaker
Installing a 240V breaker is an essential step when adding or upgrading power outlets for high-voltage appliances. It not only ensures efficient electrical distribution but also promotes safety within your household. In this guide, we will walk you through the process of installing a 240V breaker, covering important steps such as checking compatibility, matching amperage ratings, and inserting the breaker into the panel.
Checking the compatibility of the new breaker with the panel
Before you begin the installation process, it is vital to ensure that the new breaker is compatible with your electrical panel. You need to check the make and model of your panel and refer to the manufacturer’s guidelines to verify if the breaker you have purchased is compatible. Different panels have different specifications and may require specific breakers.
Here are the steps to check the compatibility:
- Identify the make and model of your electrical panel. You can usually find this information on the door of the panel or on a label inside.
- Refer to the manufacturer’s documentation to find the compatible breaker types for your specific panel.
- Inspect the breaker and compare it with the list provided by the manufacturer. Ensure that the breaker meets the required specifications.
Matching the amperage rating of the breaker with the circuit
The next step in installing a 240V breaker is to ensure that the amperage rating of the breaker matches the circuit you are working with. This ensures that the breaker can handle the electrical load without the risk of overheating or tripping. Failure to match the amperage ratings could lead to electrical hazards or damage to appliances.
Here’s how you can match the amperage rating:
- Identify the amperage rating of the circuit you are connecting the breaker to. This can be found on the circuit breaker panel or in the electrical plans of your house.
- Check the amperage rating on the new breaker to ensure it matches the circuit. It is important not to exceed the amperage rating of the circuit as it can cause damage to the wiring and other components.
Inserting the breaker into an available slot in the panel
Once you have verified the compatibility and matched the amperage rating, it’s time to install the 240V breaker into the panel. Follow these steps to ensure a proper installation:
- Turn off the main power supply to the electrical panel to prevent any electrical accidents.
- Identify an available slot in the panel where the breaker can be inserted. Make sure there is enough space around the breaker for proper ventilation.
- Align the breaker with the slot and firmly press it into place. Apply gentle pressure until you hear a click, indicating that the breaker is securely seated.
- Double-check that the breaker is properly aligned and flush with the panel.
After successfully installing the breaker, you can proceed with connecting the wires and testing the circuit to ensure it is functioning correctly. Remember to always follow safety procedures and consult a professional electrician if you are unsure about any aspect of the installation process.
Wiring The 240V Breaker
Once you have installed your 240V breaker in the electrical panel, the next step is to properly wire it. This crucial step ensures that the power is distributed safely and efficiently throughout your electrical system. In this section, we will guide you on how to connect the hot wires, attach the neutral wire, and secure the grounding wire to complete the wiring process.
Connecting the hot wires to the breaker terminals
The first step in wiring the 240V breaker is to connect the hot wires to the terminals. The hot wires are usually black or red in color and carry the electrical current. Locate the two terminals on the breaker that are labeled “Line” or “Load” and ensure that they are in the off position.
Take the end of the first hot wire and insert it into one of the terminals. Tighten the screw securely to ensure a proper connection. Repeat the same process with the second hot wire, inserting it into the remaining terminal. It is important to make sure that the wires are inserted securely and that there are no loose connections.
Attaching the neutral wire to the neutral bus bar
After connecting the hot wires, the next step is to attach the neutral wire to the neutral bus bar. The neutral wire is typically white or gray in color and is responsible for carrying the current back to the electrical panel.
Locate the neutral bus bar in your electrical panel. It is usually located on the side or at the bottom of the panel and is made up of several metal bars. Take the end of the neutral wire and strip about 1/2 inch of insulation from the end.
Insert the stripped end of the neutral wire into one of the openings on the neutral bus bar. Tighten the screw or clamp to secure the wire in place. Ensure that the neutral wire is positioned properly and that there are no loose connections.
Securing the grounding wire to the grounding bar
The final step in wiring the 240V breaker is to secure the grounding wire to the grounding bar. The grounding wire is usually green or bare copper and is responsible for redirecting any electrical faults to the ground.
Locate the grounding bar in your electrical panel. It is typically located near the neutral bus bar and is made of metal. Take the end of the grounding wire and strip about 1/2 inch of insulation from the end.
Insert the stripped end of the grounding wire into one of the openings on the grounding bar. Tighten the screw or clamp to secure the wire in place. Ensure that the grounding wire is properly positioned and tightly secured.
By following these steps, you have successfully wired the 240V breaker in your electrical panel. It is important to double-check all connections and ensure that they are secure before turning the power back on. Remember to exercise caution when working with electricity and, if needed, seek the assistance of a qualified electrician.
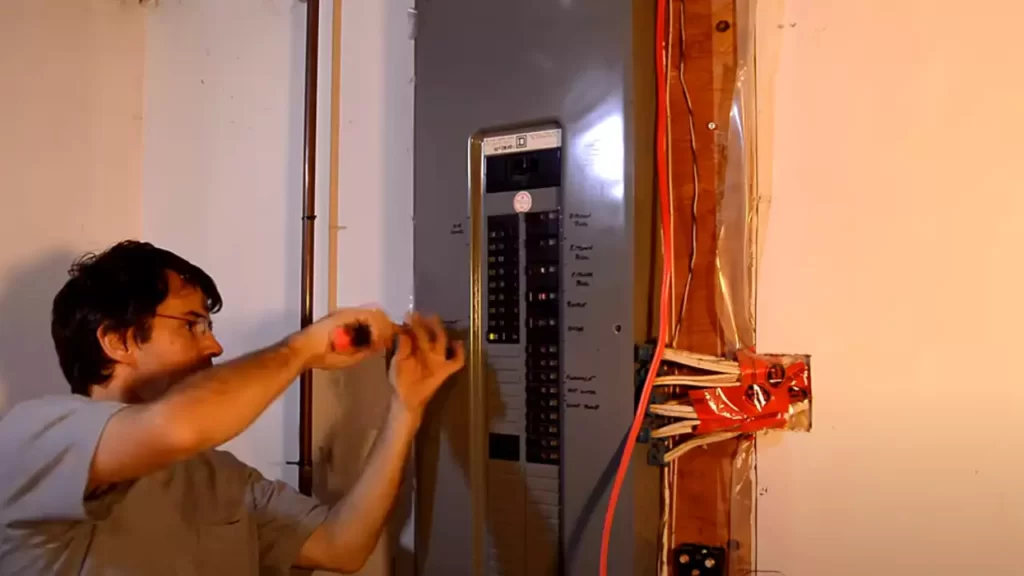
Testing The 240V Circuit
Restoring power to the panel
Before proceeding with any testing, it is important to ensure that power has been restored to the panel. Once you have successfully installed the 240V breaker, locate the main circuit breaker in your electrical panel and switch it back on. This will restore power to the entire electrical system in your home.
Verifying proper voltage using a voltage tester
Once power has been restored, you will need to verify that the 240V circuit is properly functioning. To do this, you will need a voltage tester. Start by carefully removing the panel cover to expose the wiring and breakers inside. Be cautious and exercise safety precautions when working with live electrical components.
Next, find the 240V breaker you installed earlier. Place the voltage tester onto the two terminals of the breaker, making sure the tester is securely in contact with the metal. The voltage tester will give you a reading that should indicate the presence of 240 volts. If the tester does not show any voltage or the voltage reading is incorrect, double-check the connections to ensure they are properly tightened and secure.
Testing the circuit with a load to ensure functionality
Once you have confirmed the presence of the correct voltage, you can proceed to test the 240V circuit with a load to ensure its functionality. A load refers to an electrical device or appliance that consumes power. Before connecting any load, ensure that the breaker is switched off to prevent any accidents.
Connect the load, such as an electric stove or water heater, to the 240V circuit by plugging it into the designated outlet. Once the load is connected, switch on the breaker. The load should now receive power, and the device or appliance should function properly. Observe the load to ensure there are no issues or malfunctions.
Testing with a load is an essential step as it provides a practical demonstration of the 240V circuit’s capability to power high-voltage appliances or devices. If the load is not receiving power or not functioning correctly, double-check the wiring connections and consult a professional electrician if necessary.
Always exercise caution when working with electricity and remember to follow local electrical codes and regulations. If you are unsure or uncomfortable with any part of the installation or testing process, it is best to seek professional assistance.
Working With Electrical Power Safely
When it comes to working with electrical power, safety should always be the top priority. Whether you’re a professional electrician or a DIY enthusiast, taking the necessary precautions will help prevent accidents and ensure a successful installation of a 240V breaker. In this section, we will discuss some important safety measures that you should follow throughout the process.
Wearing appropriate personal protective equipment (PPE)
When dealing with electricity, it’s crucial to protect yourself from potential hazards. Wearing appropriate personal protective equipment (PPE) is essential to minimize the risk of injury. Here are some PPE items that you should have before you start:
| PPE Item | Description |
|---|---|
| Gloves | Insulated gloves made of rubber or neoprene can protect you from electric shocks. |
| Safety glasses | Safety glasses with side shields can shield your eyes from sparks or flying debris. |
| Protective clothing | Wear non-conductive clothing made of flame-resistant material to reduce the risk of burns. |
Avoiding working in wet conditions
Working with electrical power in wet conditions can be extremely dangerous. Water conducts electricity, increasing the chances of electric shock or short circuits. To ensure your safety, follow these guidelines:
- Avoid working outdoors during rainstorms or when the ground is wet.
- If you must work in a damp environment, use a ground fault circuit interrupter (GFCI) to provide extra protection against electrical shocks.
- Ensure that your work area is dry and free from any moisture.
Using insulated tools to prevent electric shocks
Using insulated tools is crucial for preventing electric shocks during electrical installation or repairs. These tools are specially designed to provide protection against accidental contact with live wires. Here are some tips to keep in mind:
- Always use insulated screwdrivers, pliers, and wire strippers when working with electricity.
- Regularly check the insulation on your tools for any signs of wear or damage. Replace them if necessary.
- Store your tools properly to avoid any chances of accidental contact with exposed wires.
By following these safety measures, you can work with electrical power confidently and reduce the risk of accidents. Don’t compromise on safety when installing a 240V breaker. Remember, it’s better to be safe than sorry!
Following Electrical Code Regulations
When it comes to installing a 240V breaker, it is crucial to follow electrical code regulations to ensure the safety of your electrical system. Adhering to these regulations not only protects your home and family but also ensures that the installation is in compliance with local building codes. In this section, we will discuss the key aspects of following electrical code regulations for a successful 240V breaker installation.
Adhering to local building codes and regulations
Before starting with the installation of a 240V breaker, it is essential to familiarize yourself with the specific local building codes and regulations in your area. These codes are put in place to ensure uniformity, safety, and proper functionality of electrical systems. It is your responsibility to adhere to these codes as a homeowner or a DIY enthusiast.
Some common building codes and regulations include the minimum distance requirements between the breaker panel and water sources, the clearance around the breaker panel, grounding requirements, and proper labeling of circuits. To ensure compliance, consider consulting the National Electrical Code (NEC) and any additional regulations issued by your local authorities.
Ensuring proper wire sizing and connections
Proper wire sizing and connections are crucial in a 240V breaker installation as they ensure efficient electrical performance and minimize the risk of electrical hazards. Inadequate wire sizing or improper connections can lead to overheating, voltage drop, or even electrical fires.
When selecting wires for a 240V breaker, it is essential to consider the amp rating of the breaker and the length of the wire run. Using a wire gauge that is too small can result in excessive resistance and voltage drop, affecting the performance of your electrical devices. On the other hand, using a wire gauge that is too large can be unnecessary and costly.
To determine the appropriate wire size, you can refer to the NEC wire sizing chart that specifies the maximum ampacity for different wire gauges and insulation types. It is also essential to ensure proper wire connections by using appropriate connectors, following manufacturer instructions, and double-checking for any loose or exposed wires.
Obtaining necessary permits if required
Depending on your location and the complexity of the 240V breaker installation, you may need to obtain necessary permits from your local building authority. Permits help ensure that the installation is in compliance with safety standards and that it is inspected by a qualified professional.
Before starting the installation, contact your local building department to determine if any permits are required for your project. They will provide you with the necessary information on the application process, fees, and any supporting documents needed. Skipping permits can result in legal consequences and may also affect your home insurance coverage.
In conclusion, it is important to adhere to electrical code regulations when installing a 240V breaker. By following local building codes, ensuring proper wire sizing and connections, and obtaining necessary permits if required, you can complete a safe and compliant installation.
Consulting A Professional Electrician If Needed
Seeking professional assistance for complex installations
If you are planning to install a 240V breaker or make any modifications to your electrical panel, it’s important to consult a professional electrician, especially when dealing with complex installations. While you may have some knowledge and experience in electrical work, complex installations require the expertise and skills of a licensed electrician. They have the knowledge and training to handle these types of projects safely and efficiently.
Attempting complex electrical work without the proper training and experience can lead to serious safety risks and even damage to your electrical system. By consulting a professional electrician, you can ensure that the installation is done correctly and in compliance with electrical standards.
When it comes to installing a 240V breaker, it’s essential to understand that this is a specialized task that requires technical knowledge and expertise. A professional electrician will have the necessary tools and equipment to handle the installation safely and effectively. They will also be familiar with the specific regulations and codes that apply to your area, ensuring the installation is done in compliance with electrical standards.
Consulting an electrician for panel upgrades or replacements
In addition to complex installations, consulting an electrician is also recommended for panel upgrades or replacements. Your electrical panel is the heart of your electrical system, and any modifications or upgrades should be done by a professional. Upgrading or replacing a panel requires in-depth knowledge of electrical systems, and an electrician can assess whether your current panel is sufficient for your electrical needs or if an upgrade is necessary.
Furthermore, a professional electrician can ensure that the new panel is installed correctly and safely. They will handle all the necessary permits and inspections, ensuring that the upgrade or replacement complies with local regulations.
Ensuring safety and compliance with electrical standards
The safety of your home and family should always be a top priority when it comes to electrical work. Consulting a professional electrician for complex installations, panel upgrades, or replacements guarantees that the work is done safely and in compliance with electrical standards.
Professional electricians have undergone rigorous training and have experience working with various electrical systems. They possess the knowledge and skills to identify potential hazards and ensure that the installation is done in a manner that minimizes risks.
By hiring a professional electrician, you can have peace of mind knowing that your electrical work is in capable hands. They will adhere to all safety protocols and regulations, ensuring that your electrical system is safe, reliable, and up to code.
Enjoying The Benefits Of A Properly Installed 240V Breaker
Installing a 240V breaker is a wise decision that can enhance the functionality of your electrical system. With a properly installed breaker, you can safely operate high-power appliances, promote energy efficiency, and ensure electrical stability. In this article, we will discuss the significant benefits of having a 240V breaker in your home or workspace.
Enhancing the functionality of your electrical system
When it comes to managing your electrical system, it’s crucial to ensure smooth operation and reliable performance. Installing a 240V breaker plays a vital role in enhancing the functionality of your system. With the ability to handle higher voltage demands, a 240V breaker can accommodate larger electrical loads, making it suitable for a wide range of high-power appliances and equipment. Whether you need to power up your electric stove, air conditioner, or electric vehicle charging station, a properly installed 240V breaker can handle the task efficiently.
Safely operating high-power appliances
Operating high-power appliances requires a reliable and safe electrical supply. Incorrectly powering these appliances can lead to overheating, short circuits, or even electrical fires. By installing a 240V breaker, you can ensure the safe operation of these power-hungry devices. The higher voltage capacity of the breaker allows adequate power delivery, minimizing the risks associated with overloading circuits. With a properly installed 240V breaker, you can enjoy peace of mind while using high-power appliances such as electric dryers, water heaters, or spa systems.
Promoting energy efficiency and electrical stability
An efficiently installed 240V breaker can significantly contribute to promoting energy efficiency and electrical stability in your home or workspace. By using higher voltage for power-hungry appliances, the system can distribute electricity more efficiently, resulting in lower energy consumption. Additionally, properly installing a 240V breaker can help reduce electrical fluctuations and voltage drops, ensuring a stable power supply to connected devices. This stability not only avoids damage to sensitive electronics but also enhances their performance and lifespan. With better energy efficiency and electrical stability, you can reduce your energy bills and enjoy a more sustainable electrical setup.
In conclusion, installing a 240V breaker not only enhances the functionality of your electrical system but also allows you to safely operate high-power appliances, promote energy efficiency, and ensure electrical stability. Considering the numerous benefits it offers, having a properly installed 240V breaker is a wise investment that can improve your overall electrical experience. So, if you are looking to upgrade your electrical setup, consider installing a 240V breaker and enjoy the peace of mind and convenience it brings.
Frequently Asked Questions
How Do I Install A 240V Breaker Safely And Effectively?
To install a 240V breaker, start by turning off the main power supply to ensure safety. Then, remove the cover panel of the breaker box and identify the correct slots for the breaker. Attach the hot and neutral wires to the breaker, making sure to match the appropriate amperage.
Finally, secure the breaker in place, replace the cover panel, and restore power.
What Are The Necessary Materials And Tools Required For Installing A 240V Breaker?
To install a 240V breaker, you will need a few essential materials and tools. These include a 240V breaker, wire strippers, wire connectors, a voltage tester, and a screwdriver. Make sure to choose a breaker that matches the amperage of your appliance and follow the specific instructions provided by the manufacturer.
Can I Install A 240V Breaker Without Professional Help?
Installing a 240V breaker involves working with electricity, which can be dangerous if not done correctly. It is highly recommended to hire a licensed electrician for this task to ensure safety and compliance with electrical codes. A professional electrician will have the expertise and knowledge to handle the installation seamlessly and minimize any potential risks.
Conclusion
To sum up, installing a 240V breaker may seem daunting at first, but with the right guidance and tools, it can be a straightforward process. By following the step-by-step instructions mentioned in this post, you can safely and effectively install a 240V breaker in your electrical panel.
Remember to prioritize safety, double-check your work, and consult a professional if needed. Now, you’re ready to power up your appliances and enjoy the benefits of a 240V circuit. Happy wiring!