To install a 220 outlet, you will need to follow a specific set of instructions. Here is a concise guide to help you through the process.
If you need to install a 220 outlet in your home, it’s important to have a clear understanding of the process. This type of outlet is commonly used for high-power appliances such as dryers, stoves, and air conditioners. By installing a 220 outlet, you can power these devices efficiently and safely.
However, it is essential to do this correctly to avoid any electrical hazards. We will provide you with step-by-step instructions on how to install a 220 outlet in your home. By following these instructions, even those with limited electrical experience can successfully complete the installation.
Understanding The Purpose Of A 220 Outlet
Understanding the purpose of a 220 outlet is crucial when it comes to electrical installations. A 220 outlet, also known as a 240-volt outlet, is a higher voltage outlet that is typically used for powering heavy-duty appliances. While standard outlets deliver 120 volts of electricity, a 220 outlet provides double the voltage, making it suitable for appliances that require more power. In this article, we will explore the importance of a 220 outlet in electrical installations and also discuss the different appliances that require this type of outlet.
The Importance of a 220 Outlet in Electrical Installations
A 220 outlet plays a fundamental role in electrical installations for several reasons. Here are some key reasons why a 220 outlet is important:
- High Power Consumption: Appliances such as electric ranges, ovens, dryers, air conditioners, and water heaters require a significant amount of power to operate efficiently. These appliances exert a larger load on the electrical system and thus need a 220 outlet to meet their high power demands.
- Safe Electrical Supply: By using a 220 outlet, these high-power appliances are provided with the appropriate electrical supply they need to function safely. Running powerful devices on a regular 120-volt outlet can lead to overheating, electrical malfunctions, and even potential fire hazards. A 220 outlet ensures a safe and adequate supply of electricity for these heavy-duty appliances.
- Efficient Performance: When heavy-duty appliances are powered by a dedicated 220 outlet, they operate more efficiently and reliably. These outlets provide a stable power source that allows the appliances to function optimally, reducing the risk of damage and extending their lifespan.
- Flexibility and Versatility: Having a dedicated 220 outlet in your electrical system provides flexibility and opens up the possibility of using a wider range of appliances. Whether you’re remodeling your kitchen or upgrading your laundry room, a 220 outlet gives you the freedom to choose and operate high-power devices that meet your specific needs.
Different Appliances That Require a 220 Outlet for Operation
A variety of appliances rely on a 220 outlet to function efficiently. Here are some common appliances that require a 220 outlet for operation:
| Appliance | Examples |
|---|---|
| Ovens and Ranges | Electric stoves, double ovens |
| Dryers | Clothes dryers, tumble dryers |
| Air Conditioners | Ductless mini-split systems, central air conditioners |
| Water Heaters | Tankless water heaters, electric water heaters |
| Welders and Power Tools | Welding equipment, table saws, compressors |
These are just a few examples of appliances that require a 220 outlet. It’s important to check the manufacturer’s specifications for any appliance you plan to use to ensure it requires a 220 outlet and to determine the appropriate voltage and amperage requirements.
In conclusion, understanding the purpose of a 220 outlet is essential for efficient and safe electrical installations. The importance of a 220 outlet lies in its ability to provide sufficient power, ensure the safe operation of heavy-duty appliances, and optimize their performance. By having a dedicated 220 outlet, you can power various appliances that require higher voltage, giving you more options and flexibility when choosing and operating your appliances.

Assessing Electrical Power Requirements
When it comes to installing a 220 outlet, one of the most critical steps is assessing the electrical power requirements. Before diving into the installation process, it’s essential to understand the power requirements of the appliance or equipment that will be connected to the outlet. This includes determining the voltage and amperage needed for the 220 outlet. By adhering to the proper power specifications, you can ensure a safe and efficient electrical installation.
Understanding the Power Requirement of the Appliance
Before installing a 220 outlet, it’s crucial to have a clear understanding of the power requirement of the appliance or equipment that will be connected to it. Different appliances have different power requirements, including voltage and amperage.
To determine the power requirement, refer to the manufacturer’s specifications or the appliance’s label. This information typically includes important details such as voltage ratings, amperage ratings, and power consumption. Make sure to carefully review these specifications to ensure that the appliance is compatible with a 220 outlet.
Determining the Voltage and Amperage Needed for the 220 Outlet
Once you have a clear understanding of the power requirement of the appliance, the next step is to determine the voltage and amperage needed for the 220 outlet. This will ensure that the outlet can provide the necessary electrical supply to the connected appliance without any issues.
To determine the voltage required, check the appliance’s specifications for the voltage rating. Common voltage ratings for appliances include 220V, 230V, or 240V. Make sure that the voltage of the appliance matches the voltage rating of the 220 outlet you will be installing.
Next, determine the amperage needed for the outlet. The amperage refers to the amount of current the appliance requires to function properly. Typically, appliances have their amperage rating listed either on the label or in the manufacturer’s specifications. Ensure that the amperage rating is within the capabilities of the 220 outlet that will be installed.
To calculate the wattage needed for the 220 outlet, multiply the voltage by the amperage. For example, if an appliance requires 220 volts and 20 amps, the wattage needed would be 220V * 20A = 4400W. This information will be helpful when selecting the appropriate size and type of wire for the installation.
By properly assessing the electrical power requirements, you can ensure that your 220 outlet installation is safe, efficient, and compatible with the appliance or equipment you plan to connect. Taking the time to understand the power needs of your appliance and selecting the proper voltage and amperage will help avoid any potential electrical issues down the line.
Gathering The Necessary Tools And Materials
Before you start installing a 220 outlet, it’s important to gather all the necessary tools and materials. This will help ensure a smooth installation process without any unnecessary delays or hiccups. In this section, we will cover the essential tools and the required materials you will need to have on hand.
Essential Tools for Installing a 220 Outlet
Having the right tools will make the installation process much easier and more efficient. Here are the essential tools you’ll need:
- A voltage tester to ensure the power is off before working
- A tape measure for accurate measurements
- A screwdriver set for tightening screws
- A wire stripper to remove the insulation from wires
- A wire cutter for cutting wires to the required length
- A level to ensure the outlet is installed straight
- A drill for creating holes in walls or other surfaces
- A reciprocating saw for cutting into drywall or other materials
- A hammer for securing electrical boxes
Having these tools readily available will save you time and effort during the installation process.
Required Materials and Equipment
In addition to the tools mentioned above, you will also need specific materials and equipment to complete the installation. Here is a list of the required items:
| Materials | Equipment |
|---|---|
| 220-volt electrical wire | Electrical junction box |
| Wire connectors | Wire staples |
| Outlet cover plate | Drill bits |
| Outlet receptacle | Electrical tape |
| Wire nuts | Wall template (if needed) |
Double-check the materials list to ensure you have everything you need before starting the installation process. This will help prevent any interruptions or delays.
Now that you’re aware of the essential tools and required materials, you’re well-equipped to start installing a 220 outlet. In the next section, we will cover the step-by-step process of installing the outlet.
Turning Off The Power Supply
Importance of Safety Precautions Before Starting the Installation
When it comes to any electrical work, ensuring your safety and the safety of those around you is of utmost importance. Before you start installing a 220 outlet, it is crucial to take some safety precautions to prevent any accidents or injuries.
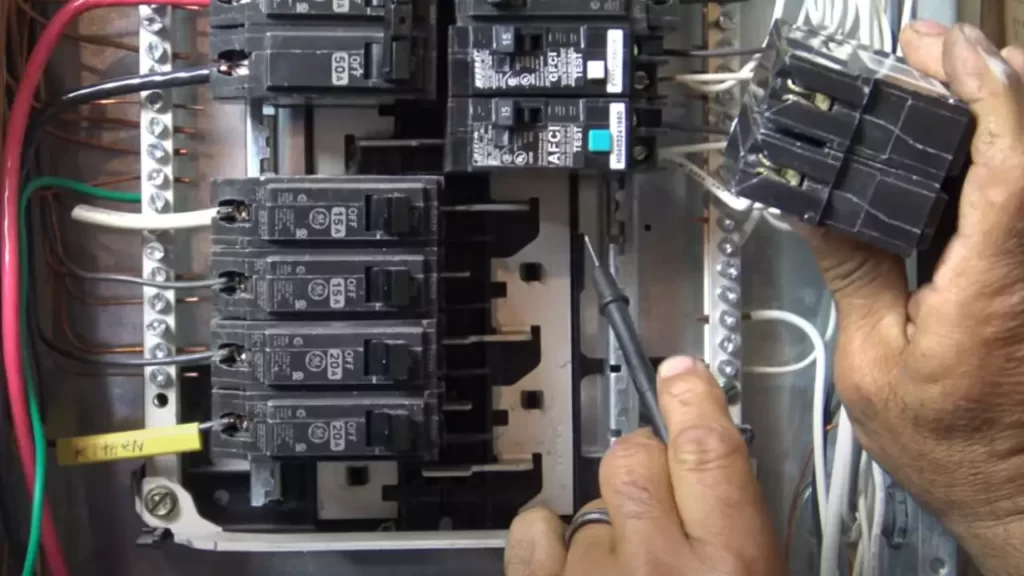
Locate and Turn Off the Correct Circuit Breaker
Before diving into the installation process, you need to locate and turn off the power supply for the designated circuit. This will protect you from any potential electrical hazards.
Here’s a step-by-step guide on how to turn off the power supply using the circuit breaker:
- Begin by accessing your circuit breaker panel. This is usually located in a basement, utility room, or garage.
- Open the panel door and locate the circuit breaker associated with the circuit where you plan to install the 220 outlet.
- Identify the circuit breaker by looking for a label that corresponds to the room or appliance it powers. If no label is present, you can check by systematically turning off each breaker until you find the one that controls the desired circuit.
- Once you have identified the correct circuit breaker, firmly push the breaker switch to the “off” position. This will cut the power supply to the circuit.
- Finally, double-check that the power supply is indeed turned off by testing the outlet or appliance that is connected to the circuit. If there is no power, you can proceed with the installation process.
It is important to remember that even after turning off the circuit breaker, there may still be residual electrical charge in the wires. To ensure your safety, it is recommended to use a voltage tester to confirm that no electricity is present before starting any work.
By following these steps and adhering to the necessary safety precautions, you can safely turn off the power supply and move forward with installing your 220 outlet. Remember, it is always better to be safe than sorry when it comes to electrical work.

Identifying The Correct Wiring Configuration
Understanding the different wiring configurations for a 220 outlet
When installing a 220 outlet, it is crucial to identify the correct wiring configuration to ensure safe and efficient operation. The wiring configuration determines the voltage, current, and frequency of electricity that will power your specific appliance. To help you navigate this process successfully, let’s explore the different wiring configurations and how to determine the appropriate setup for your needs.
Determining the appropriate wiring setup for the specific appliance
Not all appliances require the same wiring setup, as each has unique power requirements. It is essential to determine the appropriate wiring setup for your specific appliance before installing the 220 outlet. Here are the steps to follow:
- Refer to the appliance manual: Start by consulting the manufacturer’s manual or documentation that accompanied your appliance. Look for information regarding the power input requirements, which typically include voltage, amperage, and frequency specifications.
- Check the appliance label: In some cases, the power input requirements may be conveniently displayed on the appliance itself. Look for a label or plaque that provides vital information about the necessary power configuration.
- Research online: If you can’t find information from the manufacturer or appliance label, consider searching for your specific appliance model online. Many manufacturers provide product information and specifications on their websites, which can help you determine the appropriate wiring setup.
- Consult a professional: If you still have trouble identifying the correct wiring setup or aren’t confident in your own assessment, it is always a good idea to seek advice from a licensed electrician. They have the expertise to interpret appliance requirements and ensure a safe and compliant installation.
Once you have identified the appropriate wiring setup for your specific appliance, you can proceed with the installation process confidently. Remember, the correct wiring configuration is crucial for the safe and efficient operation of your 220 outlet and appliance.
Running New Wires
Planning the route for new wiring
Before you begin installing a 220 outlet, it’s crucial to plan the route for running new wires from the electrical panel to the outlet location. This process ensures that the wiring is installed in the most efficient and safe manner. Here’s a step-by-step guide on how to run new wires:
Step 1: Gather the necessary tools and materials
Before you start running new wires, make sure you have all the tools and materials required for the job. Some of the essential items include:
- Wire cutters
- Wire strippers
- Electrical tape
- Fish tape
- Cable clamps
- ROMEX or MC cable
- Wire connectors
Step 2: Turn off the power
Before working with electrical wiring, it’s vital to turn off the power at the electrical panel. Locate the correct circuit breaker and switch it off to ensure your safety.
Step 3: Determine the optimal route
Identify the best path for running the new wires. Consider factors such as the shortest distance, avoiding obstacles, and minimizing any interference with existing wiring. You may need to drill holes in walls or use conduit to protect the wires.
Step 4: Map out the wiring pathway
Using a tape measure and a pencil, mark the specific locations where the wires will run. This will help you stay organized and ensure accurate measurements for cutting and installing the wires.
Step 5: Prepare the wires
Measure the required length of the wires for each section of the pathway. Use wire strippers to remove the insulation at the ends of the wires. Ensure there is enough bare wire exposed for proper connections.
Step 6: Run the wires
With the pathway planned and the wires prepared, it’s time to run the new wiring. Carefully feed the wires through the designated route, using a fish tape or cable clamps to guide them through tight spaces or around corners.
Step 7: Secure the wires
Once the wires are in place, secure them using cable clamps or conduit as necessary. This helps protect the wires from damage and ensures they won’t become loose or tangled over time.
Step 8: Connect to the electrical panel
Finally, connect the wires to the electrical panel following the manufacturer’s instructions. Make sure to use wire connectors to ensure secure and proper connections. Double-check all connections before closing up the panel.
By following these step-by-step instructions, you can successfully run new wires for your 220 outlet installation. Remember to prioritize safety throughout the process and consult a professional electrician if you are unsure about any aspect of the job.
Installing The Outlet Box
One crucial step in installing a 220 outlet is ensuring that the outlet box is properly installed. The outlet box serves as the foundation for the outlet and protects the electrical wiring connections. In this section, we will explore the necessary steps to select and mount the outlet box securely, ensuring a safe and efficient installation.
Selecting the Appropriate Outlet Box for the Installation
Choosing the right outlet box is essential to ensure a successful installation. The outlet box should be compatible with the electrical wiring and provide adequate space for the 220 outlet connections. Here are some factors to consider when selecting the appropriate outlet box:
- The box should be rated for the voltage and amperage required for the 220 outlet.
- Ensure the box is compatible with the electrical wiring system (e.g., metal or plastic).
- Consider the size of the box to accommodate the number of wires and proper spacing for the outlet connections.
- Check for any additional features required, such as knockouts for cable entry or built-in cable clamps for strain relief.
Take note of these considerations when purchasing the outlet box to ensure a proper fit and compatibility with your electrical system.
Mounting the Outlet Box Securely
Once you have selected the right outlet box, it’s time to mount it securely. Proper mounting is crucial to avoid any movement, which could loosen the electrical connections and pose a safety risk. Follow these steps to securely mount the outlet box:
- Choose a suitable location for the outlet box, ensuring it is easily accessible.
- Use a stud finder to locate and mark the position of the wall studs where the outlet box will be mounted.
- Position the outlet box against the wall, aligning it with the marked studs.
- Securely fasten the outlet box to the wall studs using screws or other appropriate mounting hardware.
- Ensure the outlet box is level and tightly secured to the wall.
By following these steps, you can ensure the outlet box is securely mounted, providing a stable foundation for the 220 outlet.
Installing the outlet box correctly sets the stage for a successful 220 outlet installation. Remember to select the appropriate outlet box according to the recommended specifications and mount it securely. These steps lay the groundwork for the next stages of installing the 220 outlet, allowing you to proceed with confidence.
Connecting The Wires To The Outlet
Once you have properly stripped the wires, it’s time to connect them to the outlet. This step is crucial to ensure a safe and effective installation of your 220 outlet. In this section, we will guide you through the process of connecting the wires and securing the connections using wire nuts.
Properly Stripping and Connecting the Wires to the Outlet
Before you begin connecting the wires to the outlet, make sure to follow these steps to properly strip the wires:
- Measure the length of insulation you need to remove from the wire, typically around ¾ inch.
- Use wire strippers to strip off the insulation, being careful not to cut into the wire itself. Ensure that the bare wire is not damaged or frayed.
- For the 220 outlet, you will have three wires: a black or red wire for the hot terminal, a white wire for the neutral terminal, and a green or bare copper wire for the ground terminal.
Once the wires are properly stripped, follow these steps to connect them to the outlet:
- Identify the corresponding terminals on the 220 outlet. The hot terminal is usually brass or black, the neutral terminal is silver, and the ground terminal is green or has a green screw.
- Attach the black or red wire to the hot terminal by inserting the exposed wire into the terminal and tightening the screw securely. Ensure that the wire is inserted fully and there is no exposed wire outside the terminal.
- Next, connect the white wire to the neutral terminal in a similar manner. Insert the exposed wire into the terminal and tighten the screw firmly.
- Finally, connect the green or bare copper wire to the ground terminal. Insert the exposed wire into the terminal and tighten the screw securely.
Securing the Connections and Using Wire Nuts
Once the wires are connected to the outlet, it’s important to secure the connections properly. Use wire nuts to ensure that the connections are safe and to prevent any accidental contact between the wires.
Here’s how to secure the connections using wire nuts:
- Twist the wires together tightly, ensuring that no bare wire is exposed outside the wire nut.
- Select an appropriately sized wire nut based on the gauge of the wires. Choose a wire nut that is large enough to accommodate all the connected wires without overcrowding.
- Place the wire nut over the twisted wires and twist it clockwise until it is securely fastened.
- Gently tug on the wires to make sure they are firmly connected and cannot be pulled out from the wire nut.
When all connections are secured with wire nuts, double-check your work to ensure that each wire is connected to the correct terminal and that all connections are tight and secure.
By properly stripping and connecting the wires to the 220 outlet and securing the connections with wire nuts, you can ensure a safe and reliable electrical installation. Make sure to follow the specific instructions provided by the manufacturer for your particular outlet model and consult a professional if you are unsure about any step of the process.
Installing The Outlet In The Box
Installing the outlet in the box is a crucial step in the process of setting up a 220 outlet. This step ensures that the outlet is securely placed within the electrical box, providing a safe and efficient power supply. In this section, we will guide you through the two important tasks of inserting the outlet into the box and properly securing it.
Inserting the outlet into the box:
To begin with, carefully insert the 220 outlet into the electrical box. Make sure to align the outlet’s screw holes with the holes in the box. This will ensure a proper fit. Take note of the following steps:
- Remove the cover from the electrical box by unscrewing the screws that hold it in place. Keep the screws in a safe place, as you will need them later.
- Hold the outlet by its edges and gently guide it into the box, ensuring that the wire connections are neatly tucked inside. It’s important to handle the outlet with care to avoid any damage.
- Check that the outlet is centered within the box and that it sits flush against the wall. This will help prevent any strain on the electrical connections.
- Once the outlet is in position, insert its screws through the screw holes and into the corresponding holes in the electrical box. Use a screwdriver to tighten the screws, but be careful not to overtighten, as this can damage the outlet.
Properly securing the outlet to the box:
Securing the outlet to the electrical box ensures stability and reduces the risk of any loose connections. Follow these steps to ensure the outlet is firmly attached:
- Double-check that all the outlet’s connections inside the box are secure and properly tightened. This is crucial for the outlet’s functionality and safety.
- With all the connections properly secured, carefully align the outlet’s screw holes with those in the electrical box.
- Insert the screws provided with the outlet through the screw holes and into the corresponding holes in the electrical box.
- Gently tighten the screws using a screwdriver until the outlet is securely fastened to the box. Again, be cautious not to overtighten.
- Once you’re confident that the outlet is firmly attached, replace the cover on the electrical box by aligning it with the screw holes and using the screws you initially removed.
By following these steps to insert the outlet into the box and securely fasten it, you’ll have the foundation for a safe and reliable 220 outlet. Remember to always exercise caution when working with electricity and consult a professional if you’re unsure about any aspect of the installation process.
Testing The Outlet
Testing the Outlet
Once you have successfully installed a new 220 outlet, it’s crucial to test it to ensure that everything is in working order. This step is essential for the safety of your electrical system and any appliances or devices that will be connected to the outlet. In this section, we will discuss the importance of verifying the correctness of the installation and how to use a voltage tester to ensure that the outlet is functioning properly.
Verifying the correctness of the installation
Before proceeding with testing the outlet, it’s crucial to first verify the correctness of the installation. This step ensures that the wiring and connections were done correctly, minimizing the risk of electrical accidents or damage to your electrical system. Here are a few key points to consider when verifying the installation:
1. Visual inspection: Start by visually inspecting the outlet to ensure that all wires are properly connected and secure. Look out for any loose connections, exposed wires, or signs of damage. If you notice any issues, it’s important to address them before proceeding with the testing.
2. Checking the circuit breaker: Locate the circuit breaker panel and ensure that the breaker related to the new outlet is in the correct position. If it is in the off position, switch it on to provide power to the outlet.
3. Testing nearby outlets: If you have other outlets nearby, you can use them to verify the correctness of the installation. Plug in a device or a lamp into the nearby outlet and see if it receives power. If it doesn’t, it could indicate a problem with the installation.
Using a voltage tester to ensure proper functioning of the outlet
Now that you have verified the correctness of the installation, it’s time to use a voltage tester to ensure that the outlet is functioning properly. A voltage tester is a simple yet effective tool that allows you to check if there is power present in the outlet. Follow these simple steps to use a voltage tester:
1. Turn off the breaker: Before using the voltage tester, it’s crucial to turn off the breaker related to the outlet you are testing. This ensures your safety during the testing process.
2. Insert the voltage tester: Insert one prong of the voltage tester into the smaller vertical slot of the outlet and the other prong into the larger vertical slot. Make sure to hold the tester by the insulated handle to avoid any electric shocks.
3. Observe the tester: Once the prongs are inserted, observe the voltage tester’s indicator. If the outlet is functioning properly, the tester will indicate a voltage reading. Typically, a reading between 110-120 volts is considered normal for a 220 outlet.
4. Retest with the breaker on: After completing the previous steps, turn the breaker back on and retest the outlet with the voltage tester. This step ensures that the outlet is receiving power when the circuit is active.
By verifying the correctness of the installation and using a voltage tester to check the outlet, you can ensure that your new 220 outlet is operating safely and efficiently. Testing the outlet is an essential step that should never be overlooked when it comes to electrical installations.
Restoring Power
Now that you’ve successfully installed your 220 outlet, the next step is to restore the power supply. This is a crucial part of the process as it ensures that the outlet is properly connected and can provide the necessary voltage for your appliances. In this section, we will discuss how to reconnect the power supply and test the outlet again to ensure it is working perfectly.
Reconnecting the power supply
Before you begin reconnecting the power supply, ensure that the circuit breaker for the outlet is in the off position. This is an important safety precaution to prevent any electrical accidents. Once you’ve confirmed that the circuit breaker is off, follow these steps to reconnect the power supply:
- Locate the main electrical panel in your home. This is usually found in the basement, garage, or utility room.
- Open the panel cover using a screwdriver or the appropriate tool.
- Identify the circuit breaker for the 220 outlet. It should be labeled accordingly, but if not, refer to the circuit diagram to find the correct breaker.
- Set the circuit breaker to the on position. You should hear a click indicating that the power supply is restored.
Once you’ve completed these steps, you can move on to testing the outlet to ensure that it is functioning correctly.
Testing the outlet again after power is restored
Now that the power supply has been restored, it’s crucial to test the outlet to ensure that it is working as intended. Follow these steps to test the outlet:
- Turn off any appliances or devices that you plan to connect to the outlet.
- Double-check that the circuit breaker for the outlet is set to the on position.
- Take your voltage tester and insert it into the outlet. Ensure that the tester is properly touching the prongs inside the outlet.
- Observe the voltage tester. If it lights up or beeps, it indicates that the outlet is providing power and working correctly. If it doesn’t light up or beep, there might be a problem with the wiring or the outlet itself.
Remember, if you encounter any issues during the testing process or if the voltage tester doesn’t indicate power, it’s important to seek professional assistance to diagnose and resolve the problem.
Troubleshooting Common Issues
Installing a 220 outlet may seem intimidating at first, but with the right guidance and troubleshooting tips, you can overcome any common issues that arise during the process. In this section, we will address the most common problems that individuals face while installing a 220 outlet and provide you with practical solutions to tackle them. By following these troubleshooting tips, you can ensure that your 220 outlet functions optimally, giving you the power you need for your electrical devices.
Identifying and Resolving Common Problems during Installation
During the installation process of a 220 outlet, various issues can arise. It is crucial to identify these problems and resolve them promptly to ensure a safe and efficient electrical setup. Here are some common problems you may encounter during the installation:
- Incorrect Wiring: One of the most common issues is wiring the outlet incorrectly. This can lead to a lack of power or device malfunctions. To fix this problem, carefully review the wiring diagram provided by the manufacturer and ensure that all connections are accurate.
- Inadequate Voltage: If you find that your newly installed 220 outlet is not providing the expected voltage, it can be due to faulty wiring or a defective outlet. Inspect the wiring for any loose or disconnected connections. If everything appears to be correct, consider replacing the outlet itself.
- Tripped Circuit Breaker: If your circuit breaker keeps tripping, it indicates an overload or short circuit. To address this issue, identify the electrical devices that are connected to the circuit and unplug or turn them off. Reset the circuit breaker and gradually reconnect the devices to determine the cause of the overload.
Tips for Troubleshooting If the Outlet Fails to Work Properly
Despite your best efforts, there may be instances where the outlet fails to work properly even after a successful installation. In such cases, troubleshooting is essential to pinpoint and rectify the problem. Follow these tips to troubleshoot a 220 outlet that is not functioning as expected:
- Make sure the outlet is receiving power: Check if the circuit breaker related to the outlet has tripped. If it has, reset it and test the outlet again. If the problem persists, it could indicate a faulty circuit or wiring issue requiring professional attention.
- Confirm proper grounding: A common cause of outlet malfunctioning is improper grounding. Ensure that the ground wire is properly connected to the outlet and securely fastened to a suitable ground source. If necessary, consult an electrician to ensure proper grounding.
- Inspect for loose connections: Loose or disconnected wires can lead to a non-functioning outlet. Carefully inspect the wiring connections and tighten any loose screws or terminals. Ensure that all wires are securely connected to their respective positions.
- Test the outlet with a voltage tester: A voltage tester can help determine if the outlet is receiving the correct voltage. Follow the instructions provided with the voltage tester to assess the outlet’s functionality. If the tester indicates a fault, it may require professional assistance to resolve the issue.
By following these troubleshooting tips, you can address common issues and ensure the smooth functioning of your 220 outlet. However, if you encounter persistent problems or are unsure about performing these troubleshooting steps, it is always best to consult a licensed electrician for proper guidance and assistance.
Tips For Safety And Maintenance
Safety Precautions to Follow During and After Installation
Installing a 220 outlet requires careful attention to safety measures. By taking the necessary precautions, you can ensure a successful installation and prevent any potential hazards. Here are some important safety tips to keep in mind:
1. Shut off the power
Before beginning any electrical work, always turn off the power supply to the area where you will be installing the 220 outlet. This will help protect you from the risk of electric shock. Locate the circuit breaker panel and turn off the appropriate breaker that controls the power to the area.
2. Wear protective gear
When working with electrical installations, it is important to prioritize safety by wearing the necessary protective gear. This includes safety glasses to protect your eyes from any debris or sparks, as well as gloves to prevent any electrical burns.
3. Use proper wiring techniques
It is crucial to follow proper wiring techniques while installing a 220 outlet. This involves carefully stripping the wires, connecting them securely, and covering them with electrical tape or wire connectors. Avoid using any damaged wires and ensure that your connections are tightly secured.
4. Test the outlet
Once the installation is complete, it is essential to test the outlet before using it. You can use a voltage tester to verify that the outlet is correctly wired and functioning properly. This will give you peace of mind and ensure a safe operation of your 220 outlet.
5. Regularly inspect for damage
After the installation, make it a habit to regularly inspect the 220 outlet for any signs of damage. Look out for frayed wires, loose connections, or any other issues that may compromise the safety of the outlet. If you notice any damage, it is crucial to address it promptly to prevent any electrical hazards.
Maintaining the 220 Outlet for Long-Term Use
Safeguarding the longevity of your 220 outlet involves proper maintenance practices. By following these guidelines, you can ensure that your outlet remains in excellent condition for years to come:
1. Clean the outlet regularly
To avoid dust and debris build-up, periodically clean the outlet using a dry cloth or a soft brush. This will help maintain proper connections and prevent any potential electrical issues.
2. Avoid overload
Prevent overloading the outlet by being mindful of the appliances or equipment you connect to it. Check the power requirements of your devices, and ensure that they do not exceed the outlet’s maximum capacity. Overloading the outlet can lead to overheating and potentially cause damage or a fire.
3. Check for loose connections
Occasionally inspect the outlet for any loose connections. If you notice any loose wires or connectors, tighten them promptly to maintain a stable and safe electrical connection.
4. Seek professional assistance for repairs
If you encounter any issues with your 220 outlet or suspect any damage, it is best to seek professional assistance. Attempting DIY repairs may pose a risk to your safety and can potentially cause further damage.
By following these safety tips during installation and practicing regular maintenance, you can ensure the safe and efficient operation of your 220 outlet for years to come.
Frequently Asked Questions
How Much Does It Cost To Install A 220 Outlet?
The cost to install a 220 outlet depends on factors such as location and electrical work needed. On average, it can range from $200 to $500, including materials and labor.
Can I Install 220V Myself?
Yes, you can install 220V yourself as long as you follow the proper safety precautions and have a basic understanding of electrical work. However, it is recommended to hire a licensed electrician for more complex installations to ensure safety and compliance with local regulations.
Can You Convert A Regular Outlet To 220V?
No, you cannot convert a regular outlet to 220V. The required voltage is different, and it requires rewiring and installation of a new circuit. It’s best to hire a licensed electrician for this task to ensure safety and compliance with electrical codes.
Can You Get 220 From Two 110 Outlets?
No, you cannot get 220 volts from two 110-volt outlets. When combined, two 110-volt outlets still provide a total of 110 volts. To get 220 volts, you need dedicated circuits or outlets specifically designed to deliver that voltage.
Conclusion
Installing a 220 outlet may seem daunting at first, but with the right knowledge and tools, it can be a straightforward process. By following the step-by-step guide provided in this blog post, you can safely and efficiently install a 220 outlet in your home or workspace.
Remember to always prioritize safety and consult a professional if needed. Empower yourself with the skills to tackle electrical projects confidently.