Installing a 30 Amp RV plug requires following specific steps to ensure proper functionality and safety. To begin, gather the necessary tools and materials, such as a 30 Amp RV plug, wire strippers, and electrical tape.
Then, shut off the power to the circuit and remove the old outlet. Next, connect the wires to the corresponding terminals on the new 30 Amp RV plug and tighten the screws to secure them. Finally, install the plug into the electrical box and secure it in place.
Ensure everything is properly connected and tightly secured before restoring power to the circuit. By following these steps, you can successfully install a 30 Amp RV plug.
Choosing The Right 30 Amp Rv Plug
Different Types of 30 Amp RV Plugs
When it comes to installing a 30 Amp RV plug, one of the key factors to consider is choosing the right type of plug that best suits your RV’s electrical requirements. There are several different types of 30 Amp RV plugs available in the market, each with its own unique features and specifications. Let’s take a closer look at some of the most common types:
| Type | Description |
|---|---|
| NEMA TT-30 | This is the most widely used 30 Amp RV plug, featuring a round design with three prongs. It provides a reliable and secure connection, making it a popular choice among RV owners. |
| California Standard | Primarily used in California, this type of 30 Amp RV plug has a different prong arrangement compared to the NEMA TT-30. It ensures compatibility with RVs manufactured in the state. |
| Marinco RV Plug | Designed for compatibility with Marine-style RVs, the Marinco RV plug provides additional safety features such as a locking mechanism to prevent accidental disconnection. |
Factors to Consider When Selecting a 30 Amp RV Plug
Before making a decision, it is important to consider a few key factors that will ensure you choose the right 30 Amp RV plug for your specific needs. Here are some factors to keep in mind:
- Compatibility: Ensure the plug you select is compatible with your RV’s electrical system. Refer to your RV’s manual or consult a professional to determine the appropriate plug type.
- Quality and Durability: Invest in a high-quality plug that will withstand the rigors of RV travel and provide a long-lasting, reliable connection.
- Safety Features: Look for plugs that offer safety features such as overload protection, grounding capabilities, and secure locking mechanisms to prevent accidental disconnections.
- Installation Requirements: Consider the ease of installation and whether any additional wiring or modifications may be required to accommodate the plug.
By carefully considering these factors, you can confidently select the right 30 Amp RV plug that meets all your electrical needs and ensures a safe and reliable power connection during your RV adventures.

Gathering The Necessary Tools And Materials
Before you can begin the installation process for your 30 Amp RV plug, it’s crucial to gather all the necessary tools and materials. Having everything you need on hand will help ensure a smooth and efficient installation, saving you time and frustration. In this section, we will provide you with a list of tools and materials you’ll need to successfully complete the job.
List of Tools Needed for the Installation
To install a 30 Amp RV plug, you’ll need the following tools:
- Wire strippers
- Wire cutters
- Electrical tape
- Phillips screwdriver
- Flathead screwdriver
- Utility knife
- Voltmeter
- Drill
- Drill bits
- Adjustable wrench
- Level
Materials Required to Install a 30 Amp RV Plug
In addition to the tools mentioned above, you’ll also need the following materials:
- 30 Amp RV plug
- Electrical wire (10-gauge)
- Electrical conduit
- Wire nuts
- Screws
- Cable connectors
- Outlet box
- Outlet cover
Having all the required tools and materials will allow you to complete the installation efficiently and ensure that your 30 Amp RV plug is installed correctly. By gathering these items beforehand, you’ll save yourself the hassle of having to pause the installation process to search for missing tools or materials.
Preparing For The Installation Process
Before installing a 30 Amp RV plug, it is crucial to properly prepare the work area. Ensuring the safety of the work area and shutting off the power supply are essential steps in this process.
Ensuring the Safety of the Work Area
Prior to starting any electrical work, it is important to create a safe environment. Follow these steps to ensure the safety of your work area:
- Wear personal protective equipment (PPE), such as safety goggles and insulated gloves, to protect yourself from potential electrical hazards.
- Clear the area around the electrical panel and the spot where you will be installing the RV plug. Remove any obstructions or objects that could pose a safety risk.
- Ensure proper lighting in the work area to help you see clearly and avoid potential mistakes. Consider using a portable LED light if necessary.
- Keep a fire extinguisher nearby in case of emergencies. Familiarize yourself with its operation before starting the installation.
Shutting off the Power Supply
Before beginning the installation, it is crucial to shut off the power supply to prevent any potential accidents. Follow these steps to safely shut off the power:
- Locate the main electrical panel in your home.
- Open the panel cover using a screwdriver or other appropriate tool. Be cautious as the panel may contain live wires.
- Identify the circuit breaker that controls the power supply to the designated area where you will be installing the RV plug.
- Flip the corresponding circuit breaker to the “off” position. This will cut off power to the area and ensure your safety.
- Verify that the power is indeed off by testing the area with a non-contact voltage tester. This tool can detect the presence of live electrical currents.
By taking these precautions and properly preparing the work area, you can proceed with the installation of your 30 Amp RV plug safely and confidently.
Step-By-Step Guide To Installing A 30 Amp Rv Plug
Are you an avid camper or do you enjoy taking road trips in your RV? If so, you may have encountered the need for more power to run your appliances and devices while on the road. Installing a 30 Amp RV plug can provide you with the extra power you need to ensure a comfortable and convenient experience. In this step-by-step guide, we will walk you through the process of installing a 30 Amp RV plug, allowing you to enjoy the comforts of home wherever you go.
Locating the main electrical panel
The first step in installing a 30 Amp RV plug is to locate the main electrical panel in your home or RV. The main electrical panel is where the circuit breakers are located and is usually found in a basement, garage, or utility room. It is important to find the main electrical panel before proceeding with the installation to ensure you have access to the necessary circuits.
Identifying the circuit to connect the plug to
Once you have located the main electrical panel, the next step is to identify the circuit that you will connect the RV plug to. This circuit should have the capacity to handle a 30 Amp load. To identify the right circuit, you can refer to the circuit breaker labels or use a circuit tester to determine which circuit is suitable for your RV plug.
Shutting off the circuit breaker
Before you begin working on the electrical panel, it is crucial to shut off the circuit breaker that corresponds to the circuit you identified earlier. This step will ensure your safety and prevent any electrical accidents during the installation process. To shut off the circuit breaker, simply flip the switch to the “off” position.
Removing the cover of the electrical panel
Once the circuit breaker is turned off, you can proceed to remove the cover of the electrical panel. The cover is usually held in place by screws or bolts and can be easily removed using a screwdriver or wrench. Take care to keep the screws or bolts in a safe place to avoid misplacing them.
With the cover removed, you will have access to the circuit breakers and electrical wiring inside the panel. This is where you will connect the wires for your 30 Amp RV plug.
Remember: Working with electricity can be dangerous. If you are not confident in your abilities or lack the necessary knowledge and experience, it is recommended to consult a professional electrician for assistance. This will ensure that the installation is done correctly and safely.
Wiring The 30 Amp Rv Plug
Once you have a clear understanding of the wiring diagram, connecting the wires to the 30 Amp RV plug becomes a straightforward process. This step is crucial to ensure that your RV receives the necessary power supply and operates safely while you enjoy your adventures on the road. In this section, we will guide you through the process of wiring the 30 Amp RV plug, so you can confidently set up your electrical system.
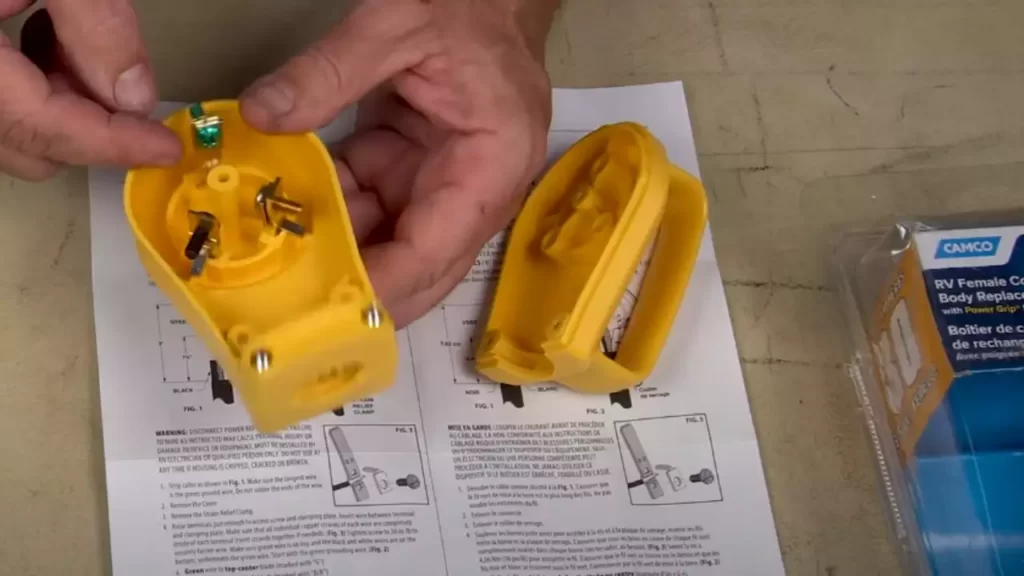
Understanding the wiring diagram
Before you begin connecting the wires to the 30 Amp RV plug, it’s important to have a good grasp of the wiring diagram. This diagram will provide you with all the necessary information on how the different wires should be connected. It typically includes details about the colors and functions of each wire, making it easier for you to identify the correct connections.
Make sure to carefully study the wiring diagram provided by the manufacturer or consult a reliable resource to ensure you have the correct information. This will help you avoid any electrical mishaps and ensure a smooth installation process.
Connecting the wires to the plug
Now that you understand the wiring diagram, it’s time to connect the wires to the 30 Amp RV plug. To do this, follow these steps:
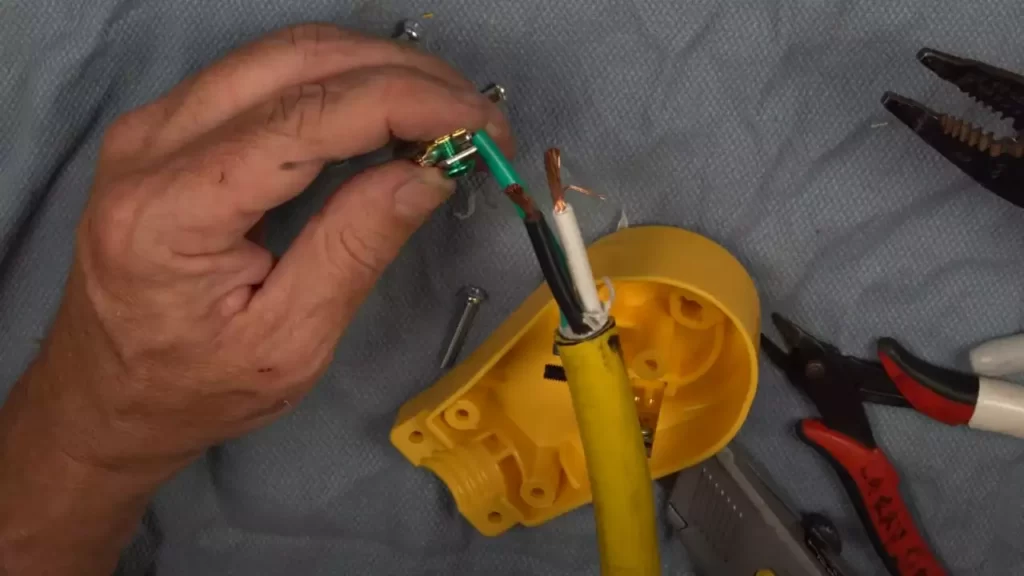
- Prepare the wires: Strip off about half an inch of insulation from each wire, exposing the copper conductors.
- Identify the terminals: The 30 Amp RV plug typically has three terminals – the hot terminal (black wire), the neutral terminal (white wire), and the ground terminal (green or bare wire). Refer to the wiring diagram to locate these terminals.
- Attach the wires: Take the black wire and connect it to the hot terminal, the white wire to the neutral terminal, and the green or bare wire to the ground terminal. Ensure a secure connection by tightening the terminal screws.
Once you have connected all the wires to their respective terminals, it’s time to move on to the final step.
Securing the connections
To complete the installation of the 30 Amp RV plug, it’s essential to secure the connections properly. This will prevent any loose connections and ensure a safe and reliable electrical system for your RV.
Start by gently tugging on each wire to check if they are firmly fixed to their respective terminals. If there is any movement, tighten the terminal screws further until the wires are securely held in place.
After securing the connections, it’s a good idea to use electrical tape or wire nuts to further protect the exposed wire ends. This additional layer of insulation will safeguard against any accidental contact or exposure.
With the connections thoroughly secured, you can proceed to test your newly installed 30 Amp RV plug. Ensure that everything is functioning correctly before relying on the electrical system for your RV’s power needs.
Congratulations! You have successfully wired the 30 Amp RV plug. By following the wiring diagram, connecting the wires correctly, and securing the connections, you have set up a sturdy and reliable electrical system for your RV.
Testing The Installation
Reconnecting the power supply
Now that you have successfully installed your 30 Amp RV plug, it’s time to put the power supply back together. Connecting the power supply is a crucial step to ensure that everything is working properly. Take the following steps to reconnect the power supply:
- Make sure that the circuit breaker is in the off position before you start. This is important for your safety.
- Identify the power source that you will be connecting the RV plug to. It could be a power pedestal or a designated power outlet.
- Take the RV plug and carefully insert it into the designated power source. Ensure that it is inserted securely.
- Once the plug is securely inserted, turn on the circuit breaker. You should hear a click sound, indicating that power is now flowing through the RV plug.
Using a volt meter to check the voltage
Now that the power supply is reconnected, it’s important to test the voltage to ensure it is within the necessary range. This will help you determine if the installation was successful or if there are any issues that need to be addressed. Follow these steps to use a volt meter to check the voltage:
- Set your volt meter to the AC voltage setting. This is usually denoted by the symbol “V~”.
- Insert the black probe into the common (COM) port of the volt meter.
- Insert the red probe into the voltage (V) port of the volt meter.
- Take the black probe and touch it to the grounding terminal of the RV plug.
- Take the red probe and touch it to the hot terminal of the RV plug.
- Check the reading on the volt meter. It should show a voltage value within the specified range for your RV plug, typically between 110V and 125V.
- If the voltage reading is within the specified range, congratulations! Your installation was successful.
- If the voltage reading is outside the specified range, there may be an issue with your installation. Double-check your wiring connections and consult a professional if needed.
Verifying the functionality of the plug
Once you have verified the voltage, it’s time to test the functionality of the RV plug. This step will ensure that everything is working properly and that you can safely use the power supply for your RV. Follow these steps to verify the functionality of the plug:
- Start by turning off all the electrical appliances inside your RV to avoid any potential damage.
- Plug an appliance into one of the outlets inside your RV.
- Turn on the appliance and check if it is working properly.
- If the appliance is functioning as expected, it means the RV plug is working correctly and providing power to your RV.
- If the appliance is not working or experiencing any issues, double-check your connections and consult a professional if needed.
Congratulations! You have successfully installed and tested your 30 Amp RV plug. Now you can enjoy a reliable power supply for your RV adventures!
Troubleshooting Common Installation Issues
While installing a 30 Amp RV plug is a relatively straightforward process, there can be a few common issues that arise. It’s essential to identify and address these problems to ensure a successful and safe installation. In this section, we will discuss some potential problems you may encounter and provide solutions to overcome them.
Identifying Potential Problems
During the installation process, you may come across a few potential problems that can hinder the operation of your 30 Amp RV plug. Identifying these issues and understanding their causes can help you troubleshoot effectively. Here are a few common issues you may encounter:
- Inconsistent power supply: One of the most common problems is an inconsistent power supply. This can lead to your RV electrical system not receiving the required voltage, causing devices to malfunction or not work at all.
- Wiring mistakes: Another common issue is wiring mistakes. Incorrectly connecting the wires or using improper connectors can disrupt the electrical flow and potentially damage your RV’s electrical system.
- Faulty connections: Faulty connections can cause intermittent power loss or surges, which can damage your RV’s electrical components. These issues may be caused by loose or corroded terminals, improper crimping, or poor insulation.
- Inadequate grounding: Inadequate grounding can pose a significant risk to your RV’s electrical system. Without proper grounding, excess electricity has no means to dissipate, potentially leading to electrical shock hazards or equipment damage.
Solutions for Common Issues
Now that we have identified some potential problems, let’s discuss the solutions for these common installation issues:
Inconsistent Power Supply:
To address inconsistent power supply, start by checking your RV’s main circuit breaker and ensure it is functioning correctly. If the circuit breaker trips frequently or shows signs of damage, consider replacing it. Additionally, inspect the power pedestal or shore power connection for any loose or faulty wiring that may be causing the inconsistent power supply. If necessary, consult a professional electrician to resolve any electrical issues.
Wiring Mistakes:
To avoid wiring mistakes, always refer to the manufacturer’s instructions and follow the proper wiring diagram for your specific RV plug. Double-check that the wires are securely connected to their respective terminals, ensuring there are no loose or exposed wires. Utilize proper connectors and wire gauges as recommended by the manufacturer to maintain a reliable electrical connection.
Faulty Connections:
To fix faulty connections, inspect all terminals and connectors for any signs of corrosion, loose connections, or improper crimping. Clean any corroded terminals thoroughly and tighten any loose connections. Consider using dielectric grease to protect the terminals from future corrosion. If you notice damaged insulation on wires, repair or replace them promptly to ensure safe operation.
Inadequate Grounding:
For proper grounding, ensure that the ground wire is securely connected to the grounding terminal of the RV plug and the RV’s electrical system. Verify that the grounding wire is properly sized according to the national electrical code (NEC) regulations and is securely attached to a grounding rod or another approved grounding method. Regularly inspect the grounding system for any signs of damage or corrosion and make necessary repairs or replacements.
By understanding these potential problems and their solutions, you can troubleshoot common installation issues and ensure a successful and safe installation of your 30 Amp RV plug. Taking the time to address these issues will provide you with a reliable power supply for your RV and ensure a worry-free camping experience.
Safety Precautions And Tips
When it comes to installing a 30 Amp RV plug, following safety guidelines is of utmost importance. Electricity can be dangerous if not handled properly, so taking the necessary precautions is crucial. In this section, we will discuss the importance of following safety guidelines as well as provide tips for a successful installation and maintenance.
Importance of Following Safety Guidelines
When working with electricity, safety should always be the top priority. Here are some key reasons why following safety guidelines is essential:
- Prevention of Electrical Accidents: Following safety guidelines helps minimize the risk of electrical accidents, which could lead to injuries or even fatalities.
- Protection of Electrical Equipment: By following safety measures, you can prevent damage to your RV’s electrical system and ensure its longevity.
- Compliance with Electrical Codes: Adhering to safety guidelines ensures compliance with electrical codes and regulations, keeping you on the right side of the law.
Tips for Successful Installation and Maintenance
Installing and maintaining a 30 Amp RV plug requires attention to detail and proper care. Here are some valuable tips to make the process smoother and prevent future issues:
- Turn Off the Power: Before starting any electrical work, always turn off the power supply. This step ensures your safety and prevents electrical shocks.
- Use Proper Tools and Equipment: Make sure you have the right tools and equipment for the installation. This includes wire strippers, electrical tape, connectors, and a voltage tester.
- Check the Wiring: Before connecting the plug, double-check the wiring to ensure it is correct and secure. Faulty wiring can lead to electrical problems or even fires.
- Tighten Connections: Ensure all connections are tight and properly secured. Loose connections can result in power failures or overheating.
- Regular Maintenance: Perform routine inspections and maintenance on the RV plug to identify any potential issues early on. This includes checking for loose connections, damaged wires, and signs of wear and tear.
- Seek Professional Help if Needed: If you are unsure about any aspect of the installation or maintenance, it is always wise to seek the assistance of a qualified electrician.
By following these safety precautions and tips, you can ensure a safe and successful installation of your 30 Amp RV plug. Remember, electricity is not something to be taken lightly, and investing time and effort into proper installation and maintenance will pay off in the long run.
Frequently Asked Questions
How Do I Hook Up My 30 Amp Rv To My House?
To hook up your 30 amp RV to your house, follow these steps: 1. Make sure your house has a 30 amp outlet. 2. Connect the RV’s power cord to the outlet using a 30 amp RV adapter. 3. Switch off the RV’s main breaker before plugging in.
4. Turn on the power at the house’s circuit breaker. 5. Test the RV’s electrical appliances to ensure everything is working properly.
What Do I Need To Run A 30 Amp Rv Plug?
To run a 30 amp RV plug, you will need a 30 amp power outlet and a compatible power cord. Make sure your RV is designed for 30 amp service and has a corresponding plug. Use a dedicated circuit and consult a qualified electrician for installation to ensure safe and efficient operation.
Is A 30 Amp Camper Plug 220 Or 110?
A 30 amp camper plug is typically used for 110-volt power supply, not 220 volts.
Does A 30 Amp Rv Outlet Need To Be Gfci?
Yes, a 30 amp RV outlet needs to be GFCI. GFCI, or Ground Fault Circuit Interrupter, protects against electrical shock hazards by quickly shutting off power if an imbalance is detected. This ensures the safety of people using the outlet and reduces the risk of electrical accidents.
Conclusion
To conclude, installing a 30 Amp RV plug is a simple yet crucial task for any RV owner. By following the step-by-step guide discussed in this blog post, you can ensure a safe and efficient power connection for your RV.
Remember to always prioritize safety and double-check your work. Now you can enjoy your RV adventures with confidence, knowing that your power supply is properly installed and ready to go!