To install a GFCI circuit breaker, turn off the main power supply, remove the panel cover, disconnect the circuit you want to protect, install the GFCI breaker in the panel, and reattach the circuit to the GFCI breaker. Ensuring electrical safety at home is essential, and one way to achieve this is by installing a GFCI circuit breaker.
This device protects against electrical shock hazards by constantly monitoring the flow of electricity. In this guide, we will walk you through the step-by-step process of installing a GFCI circuit breaker in your home’s electrical panel. By implementing this safety measure, you can provide peace of mind for you and your loved ones, protecting them from potential electrical hazards.
So, let’s get started and make your electrical system safer with a GFCI circuit breaker installation.
Understanding Gfci Circuit Breakers
In this section, we will delve into the key aspects of GFCI circuit breakers. We will explore what a GFCI circuit breaker is, how it works, and why it is important for safety. Understanding these fundamentals will empower you to install and maintain a GFCI circuit breaker with confidence.
What is a GFCI Circuit Breaker?
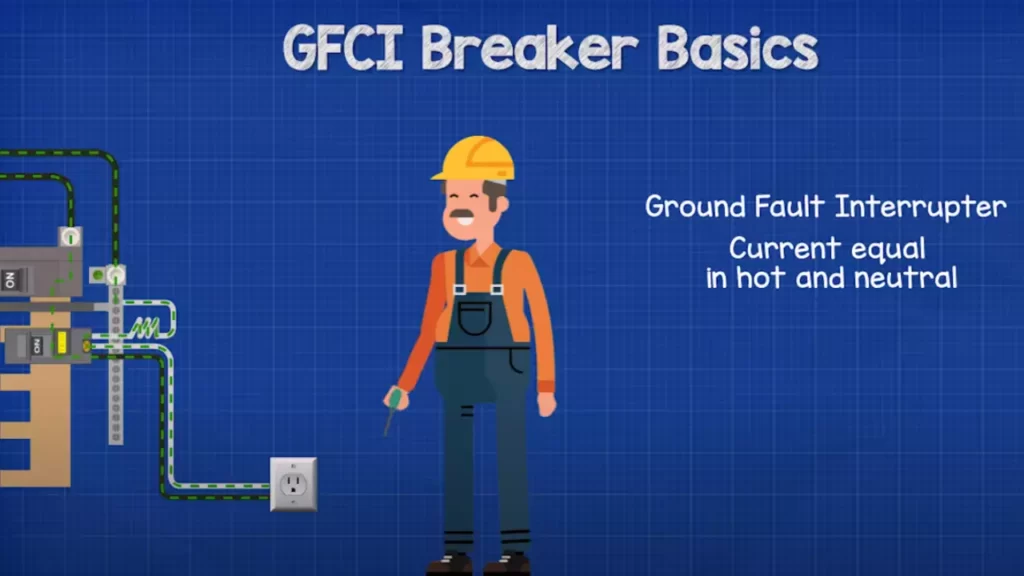
A GFCI circuit breaker is a crucial piece of electrical equipment designed to protect people from the dangers of electrical shock. GFCI stands for Ground Fault Circuit Interrupter, and it is specifically designed to detect and interrupt electrical faults, preventing potential electric shock incidents.
Unlike a standard circuit breaker that only detects overcurrent situations, such as short circuits and overloads, a GFCI circuit breaker continuously monitors the flow of electricity within a circuit. It can rapidly shut off power if it senses an imbalance in the electrical current, as small as a few milliamperes. This makes it an essential safety device for outlets near water sources, such as bathrooms, kitchens, and outdoor areas.
How does a GFCI Circuit Breaker work?
To better understand how a GFCI circuit breaker operates, let’s break it down into a few key components: the current transformer, the differential amplifier, and the tripping mechanism.
- Current Transformer: The current transformer is a key component that constantly measures the current flowing through the hot and neutral wires.
- Differential Amplifier: The differential amplifier compares the current in the hot and neutral wires. If the difference exceeds a specific threshold, it triggers an action.
- Tripping Mechanism: The tripping mechanism comes into play when the differential amplifier detects a current imbalance. It opens the circuit by tripping a mechanism, cutting off the electrical supply.
This swift response from the GFCI circuit breaker ensures that electrical shocks are prevented, reducing the risk of injury or even death.
Why is a GFCI Circuit Breaker important for safety?
Ensuring electrical safety is paramount, and a GFCI circuit breaker plays a critical role in achieving this objective. Here are a few key reasons why a GFCI circuit breaker is important:
- Protection against Electrocution: By constantly monitoring the electrical current, a GFCI circuit breaker can promptly shut off power in the event of a ground fault, preventing electric shock incidents that could be life-threatening.
- Prevention of Electrical Fires: GFCI circuit breakers mitigate the risk of electrical fires caused by ground faults or short circuits. They provide an extra layer of protection, which can be especially valuable in areas prone to water exposure or high humidity.
- Compliance with Electrical Codes: GFCI circuit breakers are mandated by electrical codes for specific areas in a residential or commercial setting. Installing and maintaining GFCI circuit breakers ensures compliance with these safety regulations.
In summary, a GFCI circuit breaker is a vital safety device that protects against electrical shocks, prevents fires, and ensures compliance with electrical codes. Understanding the inner workings of a GFCI circuit breaker empowers individuals to safeguard their homes and workplaces by installing and maintaining this critical electrical component.
Tools And Materials Required
When it comes to installing a GFCI circuit breaker, it is important to have the right tools and materials on hand. These tools will ensure that the installation process goes smoothly and that you can safely complete the task. In this section, we will discuss the tools and materials required for this project.
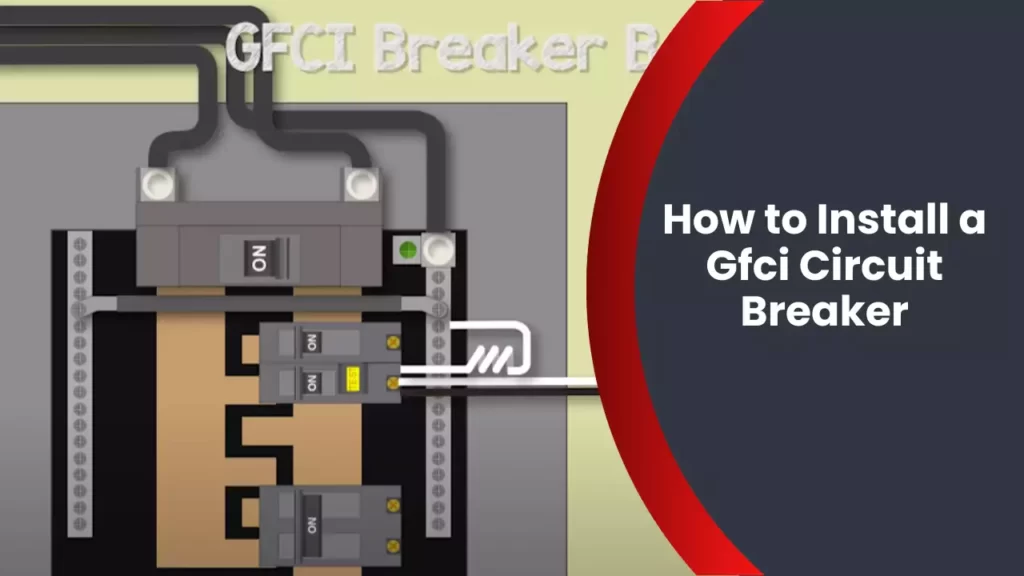
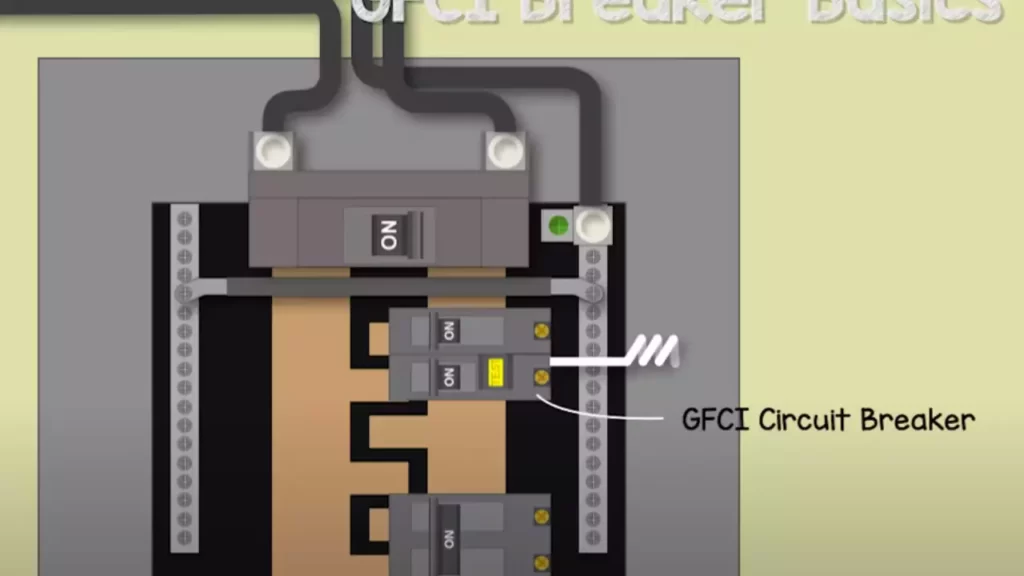
GFCI Circuit Breaker
The first and most important tool you will need is a GFCI circuit breaker. This device is designed to protect you from electrical shocks by shutting off the power when it senses a fault. It is essential for the safety of your electrical system and should not be overlooked.
Screwdriver
Another tool you will need is a screwdriver. This will be used to loosen and tighten the screws that secure the electrical wires to the circuit breaker. It is important to choose a screwdriver that fits the screws properly to avoid damaging them.
Wire Stripper
A wire stripper is a tool that is used to remove the insulation from the ends of electrical wires. This is necessary to expose the conductive parts of the wire so that it can be properly connected to the circuit breaker. It is important to use a wire stripper that is appropriate for the gauge of wire you are working with.
Voltage Tester
Before working with any electrical wiring, it is critical to ensure that the power is turned off. A voltage tester is a tool that allows you to check if a wire or device is carrying an electrical charge. It is an essential tool for determining whether it is safe to proceed with the installation.
Electrical Tape
Electrical tape is used to insulate and protect exposed electrical wires. It is typically made of vinyl and is highly resistant to heat and moisture. It is important to select electrical tape that is suitable for the environment in which it will be used to ensure proper insulation.
Wire Connectors
Wire connectors are used to join electrical wires together. They provide a secure and reliable connection that is necessary for the safe operation of your electrical system. When selecting wire connectors, it is important to choose ones that are appropriate for the gauge and type of wire you are working with.
In conclusion, having the right tools and materials is essential for installing a GFCI circuit breaker. By ensuring that you have the necessary items on hand, you can complete the installation process safely and effectively. Remember to always follow proper safety procedures when working with electricity.
Step-By-Step Guide To Installing A Gfci Circuit Breaker
Installing a Ground Fault Circuit Interrupter (GFCI) circuit breaker is a crucial step in ensuring electrical safety in your home or workspace. These circuit breakers are designed to protect you from electrical shocks and potential fire hazards. In this step-by-step guide, we will walk you through the process of installing a GFCI circuit breaker to help you safeguard your electrical system. With the right tools and following safety procedures, you can successfully install a GFCI circuit breaker and enhance the protection of your electrical circuits.
Ensuring Safety Measures are Taken
Before you begin any electrical work, safety should be your top priority. Make sure you are wearing appropriate safety gear, such as safety goggles and insulated gloves, to protect yourself from potential electrical shock. Additionally, ensure that you have turned off the main power supply and have tested the circuit to ensure it is de-energized before proceeding with the installation.
Identifying the Circuit to be Protected
The first step in installing a GFCI circuit breaker is identifying the specific circuit that needs protection. Refer to your electrical panel’s circuit map or labeling to determine which breaker corresponds to the circuit you want to protect. It is important to identify the right circuit to avoid any confusion during installation.
Turning off the Main Power Supply
To ensure your safety during the installation process, it is crucial to turn off the main power supply. Locate the main circuit breaker in your electrical panel, which is usually at the top, and switch it off to disconnect power from the entire panel. This step will prevent any accidental electrical shock during the installation.
Removing the Panel Cover
With the main power supply turned off, you can now safely remove the panel cover. Use a screwdriver to loosen and remove the screws holding the cover in place. Carefully lift the cover off the panel, exposing the circuit breakers and wiring inside.
Testing for Voltage
Take precautionary measures and test for voltage using a non-contact voltage tester before proceeding with the installation. This will ensure that the circuit is indeed de-energized and safe to work on. Place the tester near the circuit wires and confirm that there is no voltage present before proceeding.
Removing the Breaker from the Box
Locate the circuit breaker you want to replace with a GFCI breaker and carefully remove it from the panel box. Unscrew the wire terminals connected to the breaker and set the old breaker aside. Be cautious while handling the wiring to avoid any damage or accidents.
Installing the GFCI Circuit Breaker
Carefully insert the GFCI circuit breaker into the vacant slot in the panel box. Make sure it is securely seated and aligned with the other breakers. Gently press it into place until you hear a click, indicating it is properly installed.
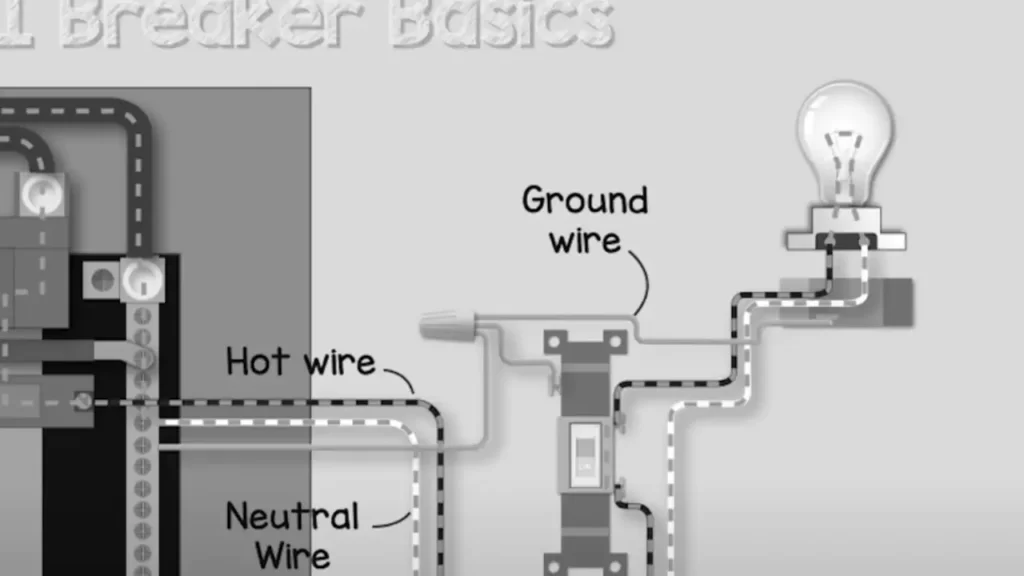
Connecting the Hot Wire
Take the hot wire, typically black in color, and connect it to the terminal marked “Line” on the GFCI breaker. Loosen the screw terminal, insert the wire into the slot, and tighten the screw firmly, ensuring a secure connection. Double-check to ensure the wire is properly secured.
Connecting the Neutral Wire
Locate the neutral wire, often white or gray in color, and connect it to the terminal marked “Neutral” on the GFCI breaker. Like the hot wire, loosen the screw terminal, insert the wire, and tighten the screw to establish a firm connection. Verify that the wire is securely fastened.
Attaching the Grounding Wire
The grounding wire, typically green or bare copper, needs to be connected to the grounding bus bar or terminal in the electrical panel. Locate the terminal labeled “Ground” on the GFCI breaker and securely attach the grounding wire to it. Ensure a tight connection to maintain proper grounding.
Securely Fastening the GFCI Breaker
To ensure the GFCI breaker stays in place, tighten the screws on each side of the breaker. These screws will secure the breaker to the panel and ensure a stable connection. Double-check that the breaker is securely fastened and flush with the other breakers in the panel.
Testing the GFCI Circuit Breaker
After completing the installation, it is crucial to test the GFCI circuit breaker to ensure it is functioning correctly. With the main power supply turned on, press the “Test” button on the GFCI breaker. This should trip the breaker to the “Off” position. Press the “Reset” button to reset the breaker and restore power. If the breaker does not trip or reset properly, consult a qualified electrician for further assistance.
Closing the Panel Cover
Once you have confirmed that the GFCI circuit breaker is working correctly, it is time to close the panel cover. Carefully align the cover with the panel and re-insert the screws to secure it in place. Tighten the screws firmly, ensuring that the cover is securely attached to the panel box.
Restoring the Main Power Supply
Finally, with the panel cover securely attached, turn on the main power supply by flipping the main circuit breaker to the “On” position. Take caution and verify that all other breakers are in the “Off” position before restoring power. This step completes the installation of the GFCI circuit breaker, providing enhanced protection for the specific circuit.
By following this step-by-step guide, you can successfully install a GFCI circuit breaker and ensure the safety of your electrical system. Remember, if you encounter any difficulties during the installation process or are unsure of any step, it is always best to consult a professional electrician for assistance.
Troubleshooting Common Issues
Even after installing a GFCI circuit breaker, you may encounter certain issues that compromise its functionality. In this section, we will discuss three common problems that homeowners often face and provide solutions for troubleshooting them.
GFCI Circuit Breaker Keeps Tripping
If your GFCI circuit breaker keeps tripping, it could be due to a variety of reasons. Here are a few possible causes and solutions:
- Overloaded Circuit: Check if you have too many appliances or devices connected to the GFCI circuit. If it is overloaded, redistribute the load or consider installing a separate circuit.
- Faulty Appliances or Devices: Disconnect all devices from the circuit and then reconnect them one by one to identify the faulty one. Replace or repair the malfunctioning device to prevent future tripping.
- Ground Fault: Inspect all outlets and receptacles on the circuit, looking for any loose connections or damaged wiring. Address any issues you find by tightening connections or replacing faulty wiring.
- Moisture or Water Intrusion: Moisture can cause GFCI breakers to trip. Ensure that all outlets and receptacles are dry and protected from water sources. Consider using weatherproof covers for exterior outlets.
By addressing these potential causes, you can often resolve the issue of a constantly tripping GFCI circuit breaker.
GFCI Circuit Breaker Not Providing Protection
If your GFCI circuit breaker is not providing the required protection, you need to investigate the problem and take appropriate action. Here are a few troubleshooting steps:
- Test the GFCI Breaker: Press the “Test” and “Reset” buttons on the GFCI breaker to ensure it is working correctly. If it fails to trip or reset, replace it with a new one.
- Faulty Wiring: Inspect the circuit’s wiring to identify any loose or damaged connections. Repair or replace the wiring as needed to restore the GFCI’s proper functionality.
- Incorrect Installation: Verify that the GFCI circuit breaker is installed correctly and according to the manufacturer’s instructions. Ensure all connections are secure and all wires are properly seated.
- Defective GFCI Breaker: If all else fails, the GFCI breaker itself may be faulty. Replace it with a new one and see if the problem is resolved.
Following these troubleshooting steps should help you determine why the GFCI circuit breaker is not providing the protection it should.
GFCI Circuit Breaker Not Properly Installed
If your GFCI circuit breaker is not properly installed, it won’t function correctly. Here are some possible installation mistakes and ways to rectify them:
- Inadequate Wiring Connections: Ensure that all connections to the breaker, outlets, and receptacles are tightly secured. Loose connections can affect the GFCI’s performance.
- Miswired Circuit: Double-check the wiring configuration to ensure it follows the correct sequence as outlined in the installation instructions. Correct any miswiring to align with the manufacturer’s guidelines.
- Incorrect Grounding: Verify that the grounding wire is properly connected to the GFCI breaker. Without proper grounding, the breaker will not provide full protection.
By rectifying these installation errors, you can ensure optimal functionality of your GFCI circuit breaker.
Additional Considerations
Additional Considerations
Installing a GFCI circuit breaker is a great way to enhance the safety of your electrical system. However, there are a few additional considerations to keep in mind to ensure a successful installation and proper ongoing maintenance. Familiarize yourself with these factors to ensure a safe and reliable electrical setup.
When to Hire a Professional Electrician
While installing a GFCI circuit breaker may seem like a manageable task, it’s important to know when it’s best to leave the job to a professional electrician. If you’re inexperienced with electrical work or uncertain about any step of the installation process, it’s wise to call in an expert. A qualified electrician has the knowledge and expertise to handle the complexities of electrical installations, ensuring your safety and preventing potential hazards.
GFCI Circuit Breaker Maintenance Tips
Once your GFCI circuit breaker is installed, proper maintenance is essential to keep it functioning optimally. Here are some maintenance tips to follow:
- Regularly test the GFCI circuit breaker using the built-in test button to ensure it’s working correctly. You should do this at least once a month.
- Keep the area around the circuit breaker clean and free from dust or debris that could interfere with its operation.
- If you notice any signs of damage or wear on the circuit breaker, such as cracks or exposed wiring, contact an electrician to assess and repair the issue promptly.
- Make sure all GFCI receptacles connected to the breaker are in proper working condition. Test them periodically to ensure they provide the necessary ground fault protection.
Understanding Local Electrical Codes and Regulations
Before installing a GFCI circuit breaker, it’s crucial to understand and comply with local electrical codes and regulations. These guidelines are in place to ensure the safety and reliability of electrical systems. Failure to adhere to these codes could result in electrical hazards or legal consequences. Take the time to research and familiarize yourself with the specific requirements of your area before proceeding with the installation.
By considering these additional factors, you can confidently install and maintain a GFCI circuit breaker, ensuring the safety of your electrical system and providing peace of mind for you and your family.
Frequently Asked Questions
How To Install Gfci Breaker In Electrical Panel?
To install a GFCI breaker in your electrical panel, follow these steps: 1. Turn off the power to the panel. 2. Remove the panel cover. 3. Locate a free breaker slot and remove the knockout. 4. Connect the hot wire to the breaker’s terminal screw.
5. Connect the neutral wire to the neutral bus bar. 6. Install the breaker into the panel by aligning the mounting brackets. 7. Replace the panel cover. 8. Turn the power back on to test the GFCI breaker.
Can I Install Gfci Breaker Instead Of Outlet?
Yes, you can install a GFCI breaker instead of a outlet. GFCI breakers provide better protection against electric shocks and are a good option for areas where water is present, like kitchens and bathrooms. However, make sure to consult a licensed electrician to ensure proper installation and safety.
Where Do You Put A Gfci Breaker?
A GFCI breaker should be installed in the electrical panel or circuit breaker box. It is a safety device that protects against electrical shocks and should be located where it can monitor the entire circuit.
Why Does My Gfci Circuit Breaker Keep Tripping?
A GFCI circuit breaker can keep tripping due to a few reasons, including a ground fault, a faulty appliance or device, moisture in the system, or a wiring issue. To fix the problem, try resetting the breaker, check connected devices, and ensure proper grounding.
Consulting an electrician may be necessary for further troubleshooting.
Conclusion
Installing a GFCI circuit breaker is a crucial step in ensuring the safety of your electrical system. By following the step-by-step guide provided in this blog post, you can easily install a GFCI circuit breaker without any hassle. Remember, safety should always be your top priority when working with electrical components.
So, don’t hesitate to seek help from a professional if you’re uncertain about any step. Enjoy a peace of mind knowing that you have taken the necessary measures to protect your home and loved ones.